Creating a Reseller
Complete the following steps to create a new Reseller:
- Sign in to the Operator Control Panel.
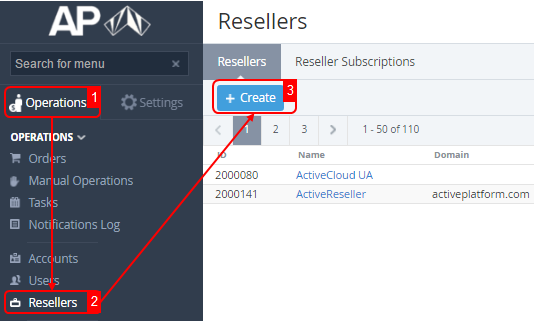
- On the Navigation Bar, click Operations > Operations > Resellers. The Workspace displays the List of Resellers (see Viewing the List of Resellers).
- Click the Create button on the Toolbar.
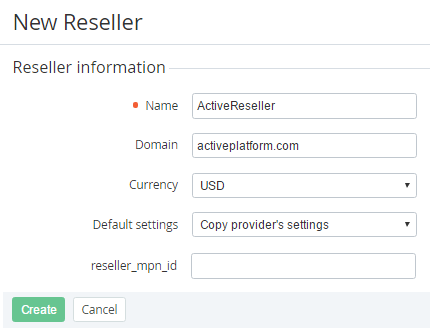
- Enter the following account information in the Reseller information area of the New Reseller page:
- Name — a reseller name that will be displayed on the online store and the Customer control panel;
- Domain — a domain name, which is used to gain access to the system by the customer and by provider staff.
- Currency — national currency for created reseller.
- Default settings — select one of the following:
- Copy default Settings — a reseller has settings by default, you need to create payment methods, configure notifications, etc.;
Copy provider's settings - a reseller settings are copied from provider's settings.
Regardless of whether the Copy provider’s settings option was selected or not, Plan Classes (see Managing Plan Classes) and Accounts Types (see Account Types) and relationships between them are copied to the new Reseller. Delegated Plan Classes and Accounts Types are available in read-only mode. You only can:
- add new Account Types to delegated Plan Class;
- change the value of the Default Payment Methods field for delegated Account Type.
- Manager — a manager of the upline Reseller (Operator) who is responsible for this Reseller.
- Email — a contact email of the Reseller in order to solve technical and billings issues.
- additional parameters, for example, reseller_mpn_id — Microsoft Partner Network ID. The value of MPN ID will be sent to Microsoft after ordering Microsoft cloud service by customer/manager of the Reseller.
- Click Create. The new reseller will be displayed on the List of Resellers (see Viewing the List of Resellers).


