Creating a Plan Class
The Plan class that was created is automatically delegated to all downline Resellers.
To create a new Plan Class:
- Sign in to the Operator Control Panel.
- On the Navigation Bar, click Operation > Products > Plan Classes. The Workspace displays the list of Plan Classes (see Viewing the List of Plan Classes).
- Click the Create button on the Toolbar.
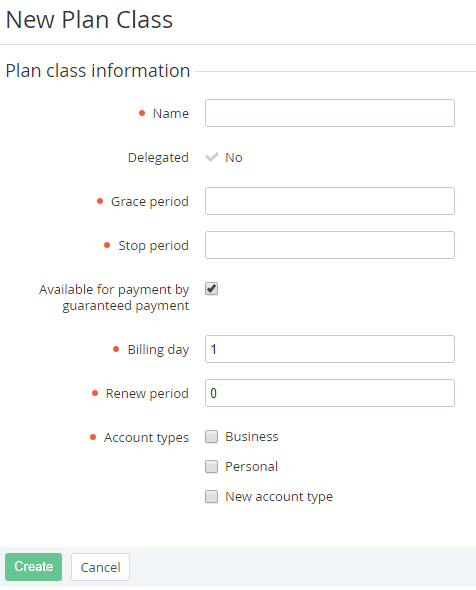
On the New Plan Class page in the Name field, type a name of the Plan Class.
We recommend to specify in the Plan class name, if it includes the Account types (see Creating an Account Type) for Accounts that works within the Postpay charging model (see Creating an Account Class).
It is necessary because some billing types don't work within the Postpay charging model in the current version of the platform (see Plan Information).
- In the Grace period field, enter a number of days after ending of the Subscription period when the Subscription will work without payment.
- In the Stop period field, enter a period (in days) after the end of Grace period, in which the Subscription will be stopped. The Subscription is deleted when Stop period ends.
- Select the
In the Billing day field, enter a day of the month when Charges (see Charges) change their statuses. This field can be set from 1 to 28 that specifies the day of the month.
Invoices (see Managing Invoices) will be created on the next day after the Billing day.
When an Account has several Subscriptions with different Billing days, several Invoces will be created.
If the -1 value is set, subscription renewing is available all subscription period. If the 0 value is set, subscription renewing is not available.
- Account Class (see Account Classes)) order the Plans that are based on this Plan Class.
- Click Create. The Plan Class will be successfully created.