Updating Plan Periods
Viewing the list of Plan periods
To view the list of Plan periods:
- Sign in to the Operator Control Panel.
- On the Navigation Bar, go to Plans (see Navigation). The list of Plans is displayed (see Viewing the List of Plans).
- Click ID or Name of required Plan. The workspace displays the Plan page.
- Go to the Plan periods tab. The workspace displays the tab content.
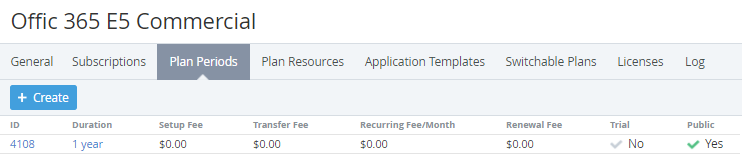
The Plan Periods tab allows to perform the following operations:
Adding a new Plan period
When the new periods were added, you need to manually synchronize the changes with downline Resellers (see Delegated Plans synchronization).
To add a new Plan period:
- Click Create on the Top bar of the Plan periods tab. The workspace displays the New Plan Period page.
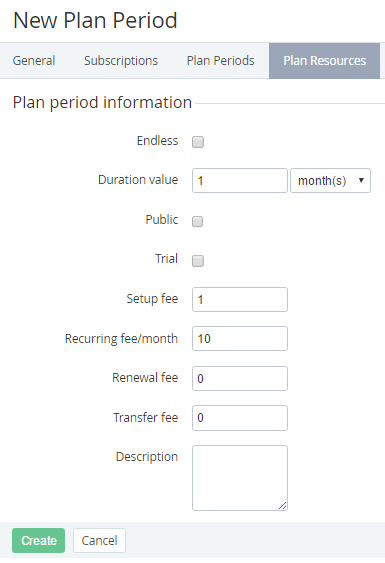
To create an endless period, select the Endless checkbox.
When the Endless checkbox is selected, the Period, Recurring fee/month, Renewal fee, Transfer fee fields as well as the Trial checkbox, become disabled.
- In the Duration value field, enter the period duration.
- In the Duration value list, select a unit of the period duration measuring: days, months, or years.
- To make the period available for ordering by customers, select the Public checkbox.
To create a trial period, select the Trial checkbox.
During the trial period, a customer can not order additional Resources.
- In Setup fee, enter the price for the Plan period setup. This is an one-time fee that can not be refunded.
- In Recurring fee/month, enter a monthly fee for the Plan period.
- In Renewal fee, enter the fee for a Subscription renewal.
- In Transfer fee, enter the fee for the domain transfer in case, when an Application (see Creating Application Templates) allows to use Domains.
- In Description, enter additional information about the period.
- Click Create. New period is created and is displayed at the Plan Periods tab.
Updating a Plan period
In case when the Period, Description, or Trial parameters are changed, you need to manually synchronize these changes with downline Resellers (see Delegated Plans synchronization).
Changes of prices are synchronized automatically via Price list (see Price List).
When prices for the Plan period are changed, the automatic markup for the Plan is disabled. The only exception are Plans with the Pay as you go (external) billing type. In this case, the prices set at the period page are ignored, and the automatic markup is enabled.
If the Plan was delegated to the downline Resellers, the changing of prices for Plan periods causes the net costs changing at the downline Resellers levels.
To update a Plan period:
- Click ID or period of the Plan period at the Plan Periods tab. The workspace displays the Plan Period page.
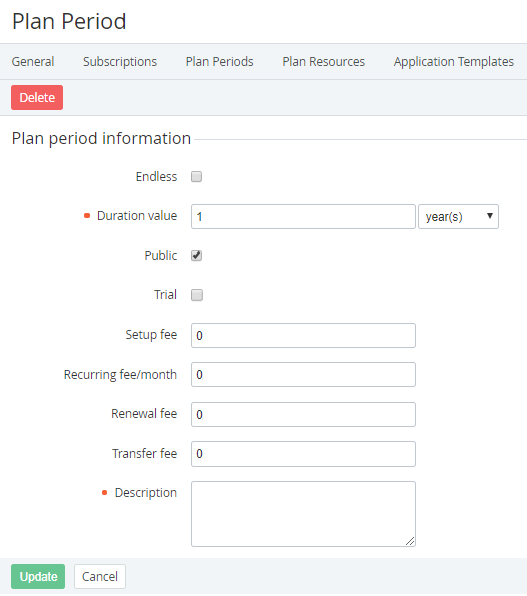
- Make required changes. Updating of period information is similar to the entering of period information during its creation.
- Click Save.
Deleting a Plan period
To delete a Plan period:
- Click ID or period of the Plan period at the Plan Periods tab. The workspace displays the Plan Period page.
- Click Delete.
- Click Confirm in the confirmation window. The Plan period is deleted. The possibility to create Subscriptions to this period is blocked. The existing Subscriptions to this Plan period are still working.