Configuring the Customer Control Panel appearance
The current version of the Customer Control Panel does not support the settings described in this article. Instead, UI Templates are used (see Viewing the List of UI Templates).
A Manager with the System administrator role can customize the appearance of the Customer Control Panel, including logos, colors, and displayed sections.
To configure the appearance of the Customer Control Panel:
- Sign in to the Operator Control Panel.
- On the Navigation Bar, go to Customer Control Panel (see Navigation). The Customer Control Panel settings page is displayed with the list of settings:
- Click the settings name. The selected settings page is displayed.
- Specify the necessary options.
- Click Update to save the changes.
See also other settings for the Customer Control Panel:
- Logos and favicon — Configuring logos.
- Date format — General system settings.
- The availability of the Account balance and joining Payments manually — Managing financial settings.
- The expiration period of the email confirmation token — User Settings.
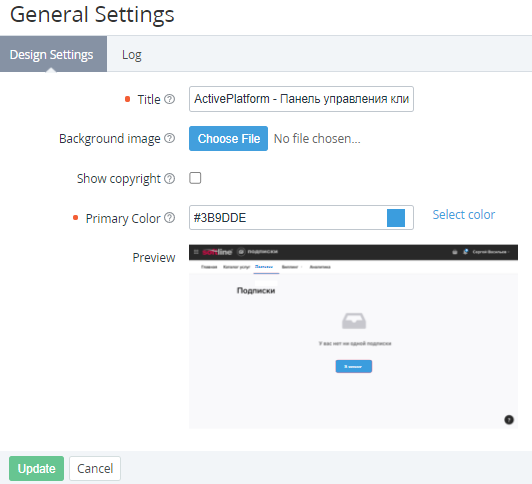
General settings
General settings:
- Title — the common part of the title for all pages of the Customer Control Panel, up to 70 characters. Default: ActivePlatform - Панель управления клиента
- Background image — the background image for the Sign in, Sign up, Reset Password pages in the Customer Control Panel. Max file size: 3 Mb. If no file is chosen, the default background color is used.
- Show copyright — if the checkbox is selected, the footer of all pages includes the ActivePlatform copyright info. Example: © Powered by ActivePlatform, 2021
- Primary Color — the color applied to primary buttons, selected tabs, sections, counters, and its HEX code (default: #3B9DDE):
- Select color — select the primary color via the palette instead of entering its HEX code.
- Preview — a preview of a Customer Control Panel page with the selected primary color. To preview the changes after entering or selecting a new color, click any place of the page.
Login page
Login page is a section with the settings of the optional welcome text displayed on the Sign in page of the Customer Control Panel in different languages (see Signing in to the Customer Control Panel). For every language, the settings are displayed in the groups as follows:
- Localization — select the language for the welcome text. The first group on the page has the read-only list with the language set as default for new users of the Customer Control Panel (see Managing language settings).
- Welcome text — the welcome text in the selected language. HTML is also supported. By default, the field is empty, and the welcome text is not displayed in the Customer Control Panel in the selected language.
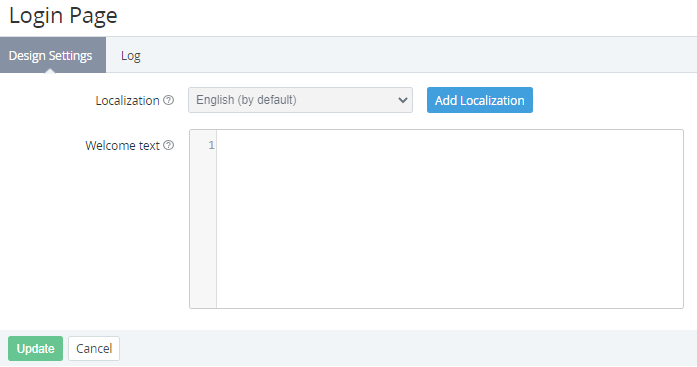
To add the welcome text in one more language:
- Next to the list with the default language in the first group, click Add Localization. A new group of the Localization and Welcome text elements is displayed at the bottom of the page.
- In the Localization list, select the required language.
- In the Welcome text field, enter the text in the selected language.
To delete a welcome text in one of the additional languages, click Delete next to the list with the selected language. No confirmation required.
Register page
Register page is a section with the settings of the optional welcome text displayed on the Sign up page of the Customer Control Panel in different languages (see Short registration). For every language, the settings are displayed in the groups as follows:
- Localization — select the language for the welcome text. The first group on the page has the read-only list with the language set as default for new users of the Customer Control Panel (see Managing language settings).
- Welcome text — the welcome text in the selected language. HTML is also supported. By default, the field is empty, and the welcome text is not displayed in the Customer Control Panel in the selected language.

To add the welcome text in one more language:
- Next to the list with the default language in the first group, click Add Localization. A new group of the Localization and Welcome text elements is displayed at the bottom of the page.
- In the Localization list, select the required language.
- In the Welcome text field, enter the text in the selected language.
To delete a welcome text in one of the additional languages, click Delete next to the list with the selected language. No confirmation required.
Billing tab
Billing tab is a section with the Show widgets settings to select widgets displayed in the Billing section of the Customer Control Panel (see Screen Layout):
- Balance — a widget with the available funds on the Account balance.
- Current consumption — a widget with the total debt for all postpaid Subscriptions of the Account for the current Billing period, excluding Payments for the previous Billing period. By default, not selected.
- Forecast amount of payments next month — a widget with the total amount of monthly payments for all active Subscriptions of the Account within the Prepay model billed monthly.

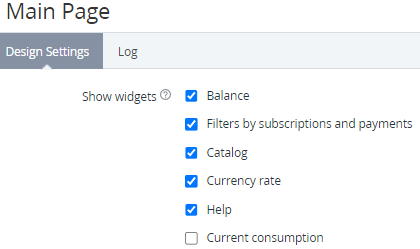
Main page
Main page is a section with the Show widgets settings to select widgets displayed on the main page of the Customer Control Panel and the Help widget settings (see Screen Layout):
- Balance — a widget with the available funds on the Account balance.
- Filters by subscriptions and payments — a widget with the list of active Subscriptions, Subscriptions to expire in 10 days, and Payments in the Waiting for payment and Expired statuses.
- Catalog — a widget with the list of Product categories.
- Currency rate — a widget with the currency rates for the Reseller currency. Only selected currencies are displayed (see Currency Rates).
- Help — a widget with custom links (see below).
- Current consumption — a widget with the total debt for all postpaid Subscriptions of the Account for the current Billing period, excluding Payments for the previous Billing period. By default, not selected.
Settings for Help widget
Settings for Help widget is a subsection with the list of links displayed in the Help widget. For every language, the settings are displayed in the groups as follows:
- Localization — select the language for the link text. The first group on the page has the read-only list with the language set as default for new users of the Customer Control Panel (see Managing language settings).
- Name — the link text in the selected language, up to 50 characters. By default, the field is empty, and the link is not displayed in the Customer Control Panel in the selected language.
- URL — the link URL. It is possible to specify any internal or external link.
- Priority — the number that defines the position of the link in the list. Links with a higher number are displayed at the top of the list. The default value is 0.
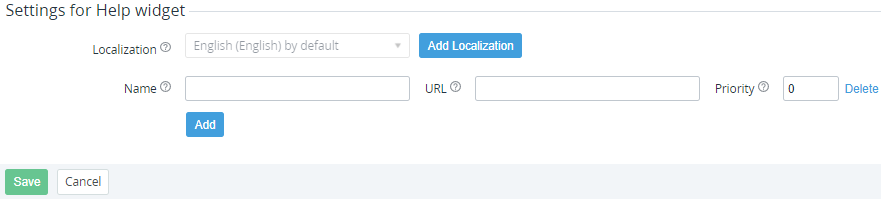
To add one more link in the selected language:
- Under the Name field, click Add. A new line of elements is displayed above the button.
- In the Name field, enter the name of the link,
- In the URL field, enter the URL of the link.
- In the Priority field, enter the number that defines the position of the link in the list.
To delete a link, click Delete in the corresponding line. No confirmation required. For the first line, the Delete button clears all the entered data.
To add a link in one more language:
- Next to the list with the default language in the first group, click Add Localization. A new group of elements is displayed at the bottom of the page.
- In the Localization list, select the required language.
- In the Name field, enter the name of the link,
- In the URL field, enter the URL of the link.
- In the Priority field, enter the number that defines the position of the link in the list.
To delete all links in one of the additional languages, click Delete next to the list with the selected language. No confirmation required.