Ordering a "Microsoft Azure" Subscription
To start using Microsoft Azure order a Microsoft Azure Subscription with an endless period (see Ordering an Application for registered Users in the Customer Control Panel Guide).
The first Azure Subscription ordering includes two additional steps:
- You need to accept the Microsoft Cloud Agreement to proceed with Subscription ordering.
- You will be asked to create a new Microsoft Azure account or add an existing one.
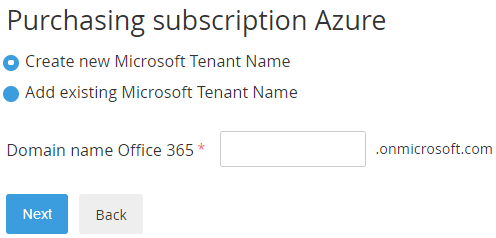
- To create a new Azure account:
- Select Create new Microsoft Tenant Name.
- In the Domain name Office 365 type the name of your subdomain (for example, example.onmicrosoft.com). The domain name Office 365 is used to create your username (yourname@example.onmicrosoft.com).
- Click Next.
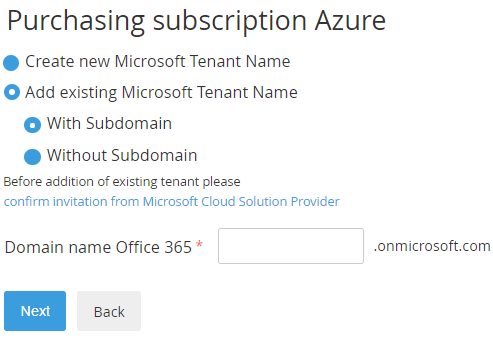
- To add an existing Azure account:
- Select Add existing Microsoft Tenant Name.
- Select With Subdomain or Without Subdomain.
- In the Domain name Office 365 type the name of your subdomain or domain.
- Click confirm invitation from Microsoft Cloud Solution Provider. You will be redirected to a new page. Follow the instructions to confirm the Microsoft Cloud Solution Provider invitation.
- Click Next.
- To create a new Azure account:
After the Azure Subscription is created, you will receive a confirmation email, and an Entry Point will appear on the Applications Dashboard (see 2018-05-16_12-06-03_.Работа со Списком услуг vAD-501).
If you have created a new Microsoft Tenant, the confirmation email will contain a login and password to access the Microsoft Partner Center.
Use the Entry Point menu to manage the Azure Subscription (see Managing a "Microsoft Azure" Subscription). Click the Entry Point to access the Microsoft Azure Portal (see Accessing the Microsoft Azure Portal).