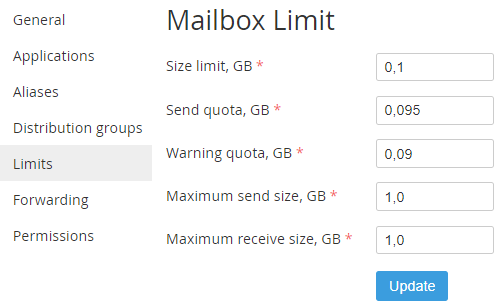
Managing the Mailboxes limits of an Internal User
To change the Internal User mailbox limits:
- Sign in to Customer Control Panel.
- Click Users on the Navigation Bar. The Workspace displays the List of Users (see Viewing the List of Users).
- Click the name of the required user in the list. The Workspace displays the information about the selected User.
You can also access the user's general information form from the Users page of the service by clicking the name of a user in the List (see Viewing the List of Users with access to a Service). - Click Limits in the Account menu. The Mailbox Limit page is displayed.
In the Size limit, GB field type the maximum mailbox size.
The Size limit parameter corresponds to the Quota parameter, that is set during mailbox creation (see Changing the mailbox quota of a user of the Microsoft Exchange service or Open-Xchange. Managing the mailbox size of a user). The Quota parameter is changed after you change the mailbox size.
- In the Send quota type the maximum used mailbox size, when sending files is still allowed.
- In the Warning quota, GB type the maximum mailbox size, when the user will get a notification about approaching the mailbox size limit.
- In the Maximum receive size, GB type the maximum size of an outgoing email message.
- In the Incoming mail maximum size, GB type the maximum sized of an incoming email message.
- Click Update. New limits are applied.


