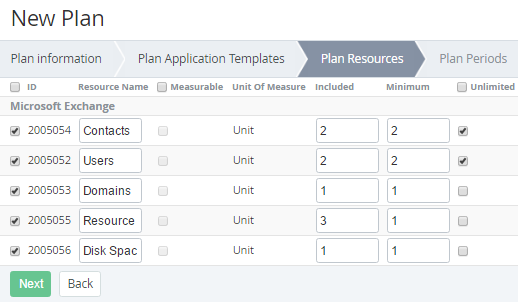
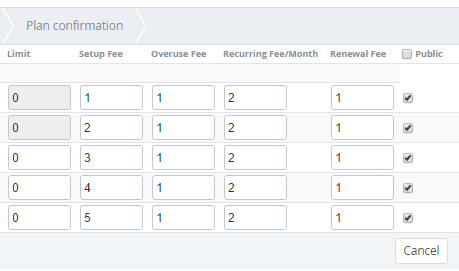
Plan Resources by Microsoft CSP program
According to the rules of Microsoft CSP program:
- All add-ons (Additional resources) must be available for the Plan.
- The number of add-ons (Additional resources) must be equal to zero for the Plan by default.
- Minimum one Licence (Additional resources) must be available to order.
To add Plan Resources to the Plan:
- Select the checkbox next to the resource name that should be included in the Plan.
- You can change the Resources Name that will be shown to customers.
- To configure price calculation of resource usage:
- The Measurable checkbox is not available.
In the Included field enter 0. This is the value of the resource which will be included in the plan by default. The Included resources are available for free.
The Included field is used to set the value of the resource which will be included in the plan by default. The Included resources are available for free.
In the Minimum field, enter 1 for the Licences count resource.
The Minimum field is used to set the minimum available amount of resources (including the value in the Included field).
For example, the Plan has Users resource with the following settings: the Included amount is 10 units and the Minimum amount is 15 units. Therefore, a customer can order minimum 15 units and the minimum chargeable amount is 15-10=5 units.
If the Included amount is 0 units then all resource amount is chargeable.
- Clear the Unlimited checkbox to activate restriction of a number of the resource, which can be ordered.
- In the Limit field, type a maximum value of the resources that are available to order. This parameter is ignored if the Unlimited checkbox is set.
- In the Setup Fee field, type 0.
- In the Overuse Fee field, type 0.
- In the Recurring Fee/ Month field, type a value of monthly fee for the resource. This type of fee is used if the customer has to pay for the resource each month to renew the subscription.
- In the Renewal fee field, type 0.
- Select the Public checkbox to make plan's resource available for sale.
- Click Next. The Workspace displays the Plan Periods step on the screen (see Plan Periods).


