Creating an Attribute
To add an Attribute for an Account:
- Sign in to the Operator Control Panel.
- On the Navigation Bar click Settings > Configuration > Attributes. The Workspace displays the List of Attributes (see Viewing the List of Attributes).
- Click the Create button on the Toolbar.
- The New Attribute page appears.
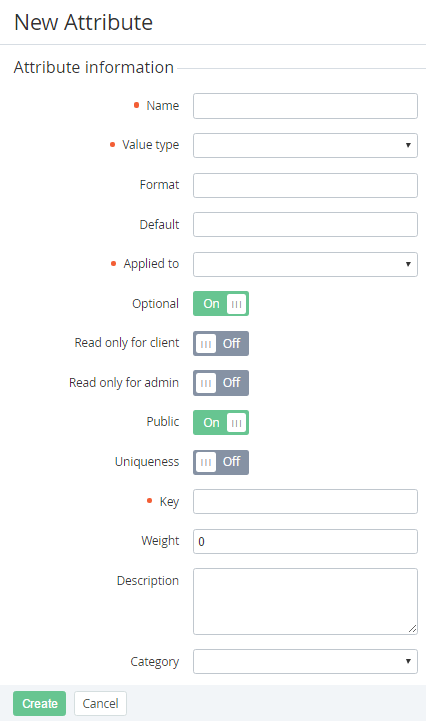
- In the Name field of the New Attribute page, type the name of the Attribute.
- In the Value type list, select one of the following value types:
- String: allows to enter any set of characters. The field of type String allows single-line text input only.
- Text: allows to enter any set of characters. The field of type Text allows multi-line text input.

- Checkbox: a checkbox appears.
- Date: a calendar appears,
- Password: masks the content of the input.
List: a dropdown box with a list of the predefined values appears.
When selecting the List value type, the Name and the Key fields appear.

To add predefined values:
- In the Name field, enter the predefined value name.
- In the Key field, enter the predefined value key.
- Click
 . The predefined value is added.
 - Create all required predefined values.
The list of the predefined values is displayed under the Name and the Key fields. In the dropdown list, the predefined values are shown in the same order they were created.
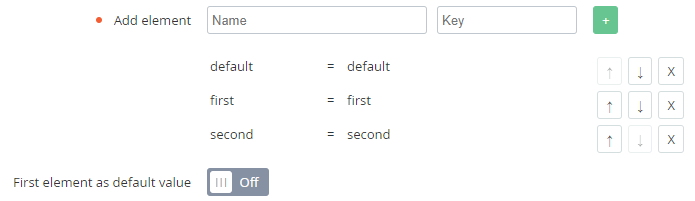
To change the order of predefined values, use
 and
and  buttons.
To delete the predefined value, use the
 button.
The default value can be set only for optional Attributes.
To set a default value:
- Move the predefined value that you need to make the default one to the first position in the list.
- Set the First element as default value to On.
In the Format field, you can enter a regular expression, which will be used to check the input value.
The Format field is not displayed when the List value type is selected.
- In the Default field, you can type the value that is used by default for this Attribute.
- In the Applied to list, select an entity, for which the Attribute will be applied: Account, User, Plan, Manager, Reseller, Resource. If you select the Account item, also you must select the Account type.
- You can turn On the Optional switcher if this Attribute is not necessary to enter.
- You can turn On the Read only for client switcher if this Attribute cannot be edited in the Customer Control Panel after creation.
- You can turn On the Read only for admin switcher, if this Attribute cannot be edited in the Operator Control Panel after creation.
- You can turn On the Public switcher to make Attribute visible to the Managers and Customers and Managers and Customers of the all downline Resellers. If the Public switcher is Off, the Attribute is displayed only for Managers in the Operator Control Panel, in which this Attribute was created.
- You can turn On the switcher, if value of the Attribute should be unique among others Attributes of this type.
- In the Key field, enter a key that is used to refer to the element by API or a Placeholder (see Using Placeholders for Event Handlers).
- In the Weight field, enter a value that sets the order of Attributes on the page. The higher is the number, the lower is the position on the page.
- In the Description field, you can enter additional information about the Attribute.
- In the Category list, you can select a Category for the Attribute (see Managing Categories of Attributes).
- Click Create. The new Attribute will be created and displayed on the List of Attributes (see Viewing the List of Attributes).