Adding a Manager
To add a Manager:
- Sign in to the Operator Control Panel.
- On the Navigation Bar, go to Managers (see Navigation). The list of Managers is displayed (see Viewing the List of Managers).
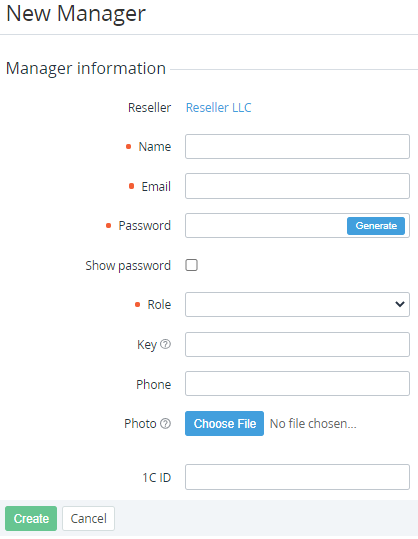
- On the Toolbar, click Create. The New Manager page is displayed.
- In the Name field, enter the Manager's name.
- In the Email field, enter the Manager's email, which will be used as the login to signing in to the Operator Control Panel.
- In the Password field, set the Manager's password for the Operator Control Panel. Do any of the following:
- Enter the password manually (see Password Settings).
- To generate the password automatically, click Generate.
- Optionally, to display the password, select the Show password checkbox.
- In the Role list, select one of the following Manager's role (see Managers' Roles):
- Sales person (sales — in the API methods).
- Marketing.
- Product owner (owner).
- System administrator (admin).
- Optionally, in the Key field, enter the Manager's unique key. This key allows linking an Account to the Manager (see Viewing and updating an Account's details) automatically when a customer orders a new Service via Customer Store with a special URL parameter (see Automatic linking an Account to a Manager). The key can include uppercase and lowercase characters, numbers, underscore, dot, and dash.
- Optionally, in the Phone field, enter the Manager's phone number in the international format.
- Optionally, in the Photo group of elements, click Choose File and upload the Manager's photo.
- If applied, set the values of the Manager's Additional attributes.
- Click Create. The new Manager will be created and displayed in the list of Managers (see Viewing the List of Managers).


