Assign user roles for Microsoft Azure Plan subscription
Use the Service Management section of the Customer Control Panel to view and assign roles to Microsoft Azure Plan subscription users.
To access the section, you may need to confirm the invitation from the reseller. Follow the instructions in the selected subsection:
- Click the invitation link.
- Log in to the Microsoft portal with the Global Admin role.
- Confirm the invitation.
- Return to the Customer Control Panel and refresh the page.
To assign a role to users of one of your Microsoft Azure Plan subscriptions:
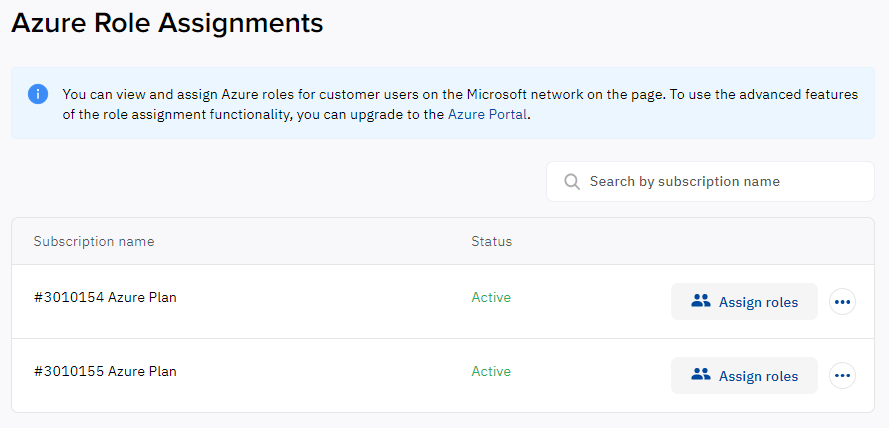
- Go to Service Management > Azure Role Assignments. The list of users of Microsoft Azure Plan subscriptions of your Microsoft tenant is displayed with the following columns:
- Subscription name — the ID and name of a subscription in the platform.
- Status — the status of a subscription in the platform. It does not limit user role assignments.
- The Assign roles button.
- The menu button with the following options:
- Assigned roles.
- Assign roles.
- Find the required subscription. If your Microsoft tenant has more than 10 subscriptions, pagination is used for the list. To go to the next or any other page, use the pagination buttons at the bottom of the page. You can find a subscription in the list by part of its ID or name. Above the list, in a field with the icon, start entering the ID or name of the required subscription. The list of subscriptions is automatically updated regarding your input.
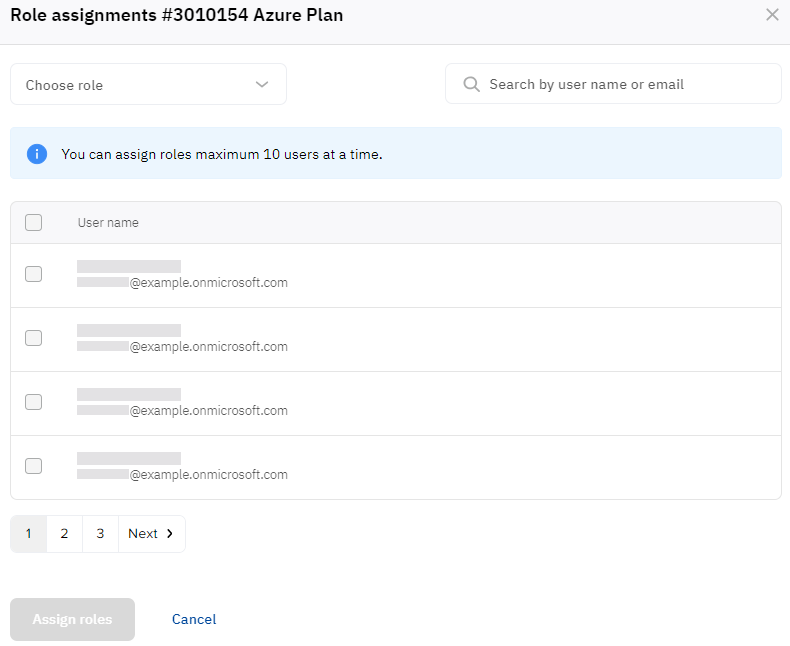
- In the line with the required subscription, click Assign roles. The Role assignments window appears with the ID and name of the selected subscription and the list of users that can have a role in the subscription.
- In the list, select the role you need to assign to users:
- Owner — subscription admins with full access to manage all resources, including the ability to assign user roles.
- Contributor — full access to manage all resources, but does not allow assigning user roles.
- Reader — access to view all resources, but does not allow making any changes.
- Select the required users by selecting their checkboxes. If your Microsoft tenant has more than 4 users, pagination is used for the list, and you can select up to 10 users. To go to the next or any other page, use the pagination buttons at the bottom of the page. You can find a user in the list by part of its name or email. Above the list, in a field with the icon, start entering the name or email of the required user. The list of users is automatically updated regarding your input.
- Click Assign roles.
To view the assigned user roles for one of your Microsoft Azure Plan subscriptions:
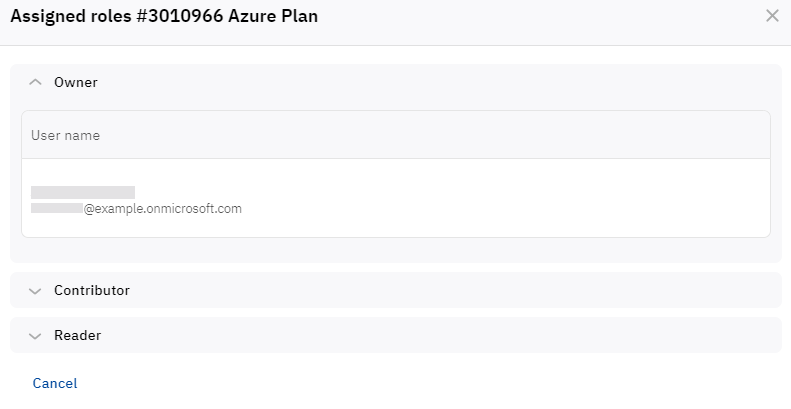
- In the Service Management > Azure Role Assignments section, in the line with the required subscription, click the menu and select Assigned roles. The list of assigned roles is displayed. The list may include the following roles:
- Owner — subscription admins with full access to manage all resources, including the ability to assign user roles.
- Contributor — full access to manage all resources, but does not allow assigning user roles.
- Reader — access to view all resources, but does not allow making any changes.
- Click the required role. The list of users with the selected role is expanded, including their names and emails.


