Creating a payment gateway connector
The Payment Gateways section is available to the root reseller only.
To create a payment gateway connector:
- Sign in to the Operator Control Panel on the root reseller level.
- Go to Payment Gateways (see Navigation). The list of payment gateway connectors is displayed (see Viewing the list of payment gateway connectors).
- Click Create. The New Payment Gateway Connector page is displayed.
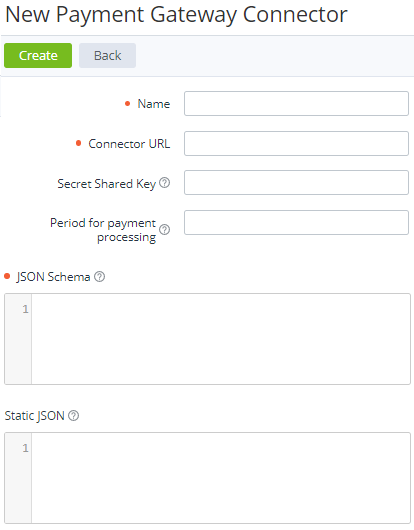
- In the Name field, enter the payment gateway connector name displayed in a payment method configuration (see Creating a payment method).
- In the Connector URL field, enter the URL to which ActivePlatform will send requests working with the payment gateway. Example: https://gateway.example.com
Define the hash function key of the payment gateway connector as follows:
The hash function key is used for signing requests and responses that the platform sends to a payment gateway. The signature is sent in the
X-signatureheader attribute as a hex-encoded string of the concatenated fields and their values in the response processed by a hash function. See the example in Gateway signing mechanism.You can create several payment gateway connectors with the same hash function key.
- If the payment gateway connector must share the same hash function key with other payment gateway connectors, in the Secret Shared Key field, enter its value.
- If the payment gateway connector must use its own hash function key, keep the Secret Shared Key field empty. After creating the payment gateway connector, the platform automatically generates its hash function key. You can view and update it later (see Viewing and updating payment gateway connector's details).
If necessary, in the Period for payment processing field, enter the number of minutes after which a payment in the Processing status must return to its previous status if no answer from a payment gateway is received.
A payment in any status, except for Processing, does not change its status after the Period for payment processing timer expiration.
If an answer from a payment gateway is received after the Period for payment processing timer expiration, a payment in the Waiting for payment or Expired status does the following:
- If an answer from the payment gateway is successful, the payment gets the Completed status. If a customer already started another attempt to pay before the payment got the Completed status:
- If an answer from the payment gateway for this attempt is successful, the payment remains in the Completed status. The amount of this attempt is returned to the account balance.
- If an answer from the payment gateway for this attempt is not successful, the payment remains in the Completed status. For the payment in the Customer Control Panel, the error message from the payment gateway is not displayed.
- If an answer from the payment gateway is not successful, the payment remains in the Waiting for payment or Expired status. For the payment in the Customer Control Panel, the error message from the payment gateway is displayed.
- If an answer from the payment gateway is successful, the payment gets the Completed status. If a customer already started another attempt to pay before the payment got the Completed status:
In the JSON Schema field, enter the data specification in the JSON format of the payment gateway connector settings to be specified later in a payment method configuration (see Creating a payment method).
A JSON schema is an array of objects that describes the payment gateway connector settings. It includes field types, requirements to their values, and the displaying order of the corresponding HTML elements (text fields, checkboxes, lists, etc.) in the Connector settings group of a payment method with Integration type = External Payment Gateway (see Creating a payment method).
A JSON schema supports the following fields:
Name
Type
Required
Unique
Description
type String Yes No HTML element type:
- string — a one-line text input field.
- password — a one-line password input field. Entered symbols are masked.
- text — a multi-line text input field.
- select — a list that allows selecting one of the options.
- radio — a group of radio buttons that allows selecting one of the options.
- checkbox — a group of checkboxes that allows selecting any of the options.
key String Yes Yes Field key label String Yes Yes HTML element label hint String No No Text of the hint that is displayed on hovering on an icon next to the label. The icon is displayed if the hint filed in non-empty required Boolean Yes No Defines whether the element must be specified default_value String No No The default value. For the select, radio, checkbox fields, the default value must match one of the value of the options options Array of Objects No No An array of objects that defines the list of available options. For the select, radio, checkbox fields only. Each object includes the following fields:
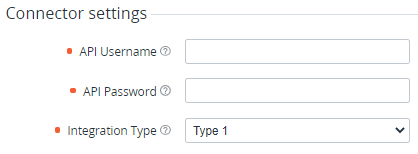
Name Type Required Description value String Yes The value of the option name String Yes The displayed name of the option priority Number No No Defines the displaying order of the corresponding HTML elements. Fields with the lower priority values are displayed higher Example of a JSON schema:
[
  {
    "type": "string",
    "key": "api_username",
    "label": "API Username",
    "hint": "Your PayPay Username",
    "required": true,
    "default_value": "",
    "options": [],
    "priority": 1
  },
  {
    "type": "password",
    "key": "api_password",
    "label": "API Password",
    "hint": "Your PayPay Password",
    "required": true,
    "default_value": "",
    "options": [],
    "priority": 2
  },
  {
    "type": "select",
    "key": "integration_type",
    "label": "Integration Type",
    "hint": "Your Integration Type",
    "required": true,
    "default_value": "type-1",
    "options": [
      {
        "value": "type-1",
        "name": "Type 1"
      },
      {
        "value": "type-2",
        "name": "Type 2"
      }
    ],
    "priority": 3
  }
]
Example of payment gateway connector settings for this JSON schema:
- If necessary, in the Static JSON field, enter the static JSON schema of the payment gateway connector settings. It defines shared settings for all payment methods to work with the payment gateway (for example, the auth parameters).
- Click Create. The platform validates the JSON schemas:
- If a JSON schema is valid, the list of payment gateway connectors is displayed, including the created payment gateway connector.
- If a JSON schema is not valid, the error message is displayed, including the description of the problem items.