Invited users
This functionality is not available if your reseller set up logging in to the Customer Control Panel with an external account (see Log in to the Customer Control Panel).
The Owner and Admins of an account can invite other users to join their account. Invitations are unique links sent to emails. If a user accepts an invitation and registers in the platform, it gets the assigned access level for the invited account. The Owner and Admins of an account can revoke only a pending invitation. After revoking, an invitation link becomes invalid and cannot be used for registration.
In this article:
Invite user
To invite a user to join an account:
- Click the user name in the upper right corner on any page. The user menu is displayed.
- In the user menu, select Accounts. The list of accounts associated with the user is displayed (see Accounts).
- Click the name of the required account. The account details page is displayed (see Account details).
- Go to the Users tab. The list of users associated with the selected account is displayed (see Account users).
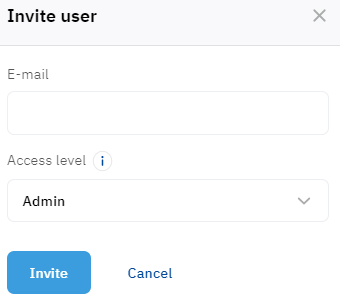
- Click Invite user. The Invite user pop-up window appears.
- In the Email field, enter a valid email to send an invitation. This email will also be used as the user's login for the Customer Control Panel.
- In the Access level list, select the access level that will be assigned to the invited user (see Access levels of users). By default, Admin is selected.
- Click Invite. An invitation is sent.
After an invitation is sent, you can view the list of invited users and revoke it.
Accept invitation
An invitation sent to the specified email includes the following information:
- The name of the user who sent the invitation.
- A unique link for registration in the Customer Control Panel. After registration, a user is automatically attached to the account of the user who sent the invitation. The link validity period depends on the reseller.
To accept an invitation:
- Follow the link from an invitation.
- Complete the quick registration with the email from the invitation (see Quick registration).
View the list of invited users
To view the list of users who do not accept their invitations yet:
- Click the user name in the upper right corner on any page. The user menu is displayed.
- In the user menu, select Accounts. The list of accounts associated with the user is displayed (see Accounts).
- Click the name of the required account. The account details page is displayed (see Account details).
- Go to the Users tab. The list of users associated with the selected account is displayed (see Account users).
- Click the Invited users link with the number of pending invitations. A pop-up window appears with the list of emails used to send invitations (up to 100). The Invited users link is not displayed if the account does not have any pending invitations.
Revoke invitation
To revoke an invitation and prohibit a user from registering in the platform using the received link:
- Click the user name in the upper right corner on any page. The user menu is displayed.
- In the user menu, select Accounts. The list of accounts associated with the user is displayed (see Accounts).
- Click the name of the required account. The account details page is displayed (see Account details).
- Go to the Users tab. The list of users associated with the selected account is displayed (see Account users).
- Click the Invited users link with the number of pending invitations. A pop-up window appears with the list of emails used to send invitations (up to 100). The Invited users link is not displayed if the account does not have any pending invitations available for revoking.
- In the row with the required email, click Delete. The invitation link sent to the selected email becomes invalid and cannot be used for registration.


