Approving manually an invoice managed by a third-party ERP system
When external management of invoices for the Postpay model by a third-party ERP system is activated (see Managing invoices for the Postpay model by a third-party ERP system), all operations with invoices issued by a third-party ERP system, invoices for the Postpay model, and linked payments are supposed to be performed automatically via the API service (see Postpaid invoices managed by a third-party ERP system). However, if a third-party ERP system fails to approve an invoice for the Postpay model, a manager can do that manually.
To approve manually a postpaid invoice managed by a third-party ERP system, this invoice must have the Closed status and be linked to a payment in the Pending billing.
To approve manually a postpaid invoice managed by a third-party ERP system:
- Go to Invoices (see Navigation). The list of invoices is displayed (see Viewing the list of invoices).
- Click the ID or number of the required invoice. The invoice details page is displayed (see Viewing details of the invoice for the Postpay charging model).
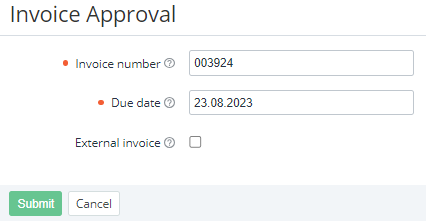
- Click Approve. The Invoice Approval page is displayed.
- If it is necessary, in the Invoice number field, enter the new number of the invoice to match the invoice in the third-party ERP system.
- If it is necessary to use a custom payment expiration period that differs from the account class settings (see Creating an account class), in the Due date field, enter the latest date for completing the linked payment. On the next day, if not completed, it gets the Expired status. The date must be in the future, including the current date. The default value is calculated using account class settings.
- Depending on the amount and currency of an invoice in the third-party ERP system, do one of the following:
- If the amount and currency of a third-party invoice match the amount of the invoice (and its linked payment) in the platform and the reseller currency, make sure the External invoice checkbox is cleared.
- If the amount or currency of a third-party invoice differs from the amount of the invoice (and its linked payment) in the platform and the reseller currency:
- Set the External invoice checkbox. A group of additional fields appears.
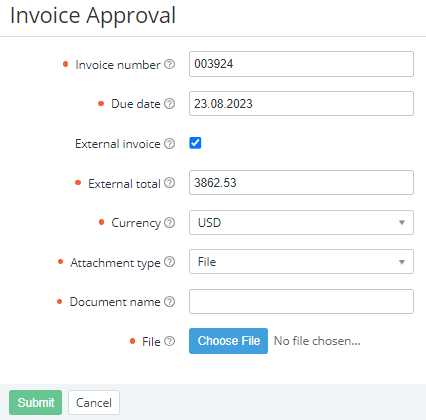
- In the External total field, enter the amount of the third-party invoice. By default, the amount of the invoice (and its linked payment) in the platform is specified.
In the Currency list, select the currency of the third-party invoice. All currencies in the platform are available (see Viewing the list of currencies). By default, the reseller currency is selected.
The specified external total and currency will be added as External total to the invoice (see Viewing details of the invoice for the Postpay charging model) and its linked payment and included in the payment comment with information about the manual approval (see Viewing payment details).
- Attach a receipt of the third-party invoice by doing one of the following:
- If you have a file of the receipt:
- Make sure that in the Attachment type list, File is selected.
- In the Document name field, enter the name of the receipt of the third-party invoice to be displayed to a customer in a notification for the The Invoice was approved event (see Creating an event handler and Placeholders used in notification templates for specific event handlers).
- In the File field, click Choose File and select your file of the receipt of the third-party invoice. The following file types are supported: PDF, DOC, DOCX, XLS, XLSX.
- If you have a link to the file of the receipt:
- In the Attachment type list, select Link.
- In the Document name field, enter the name of the receipt of the third-party invoice to be displayed to a customer in a notification for the The Invoice was approved event (see Creating an event handler and Placeholders used in notification templates for specific event handlers).
The name must not contain any slashes
/. - In the Link field, enter your link to the file of the receipt.
- If you have a file of the receipt:
- Set the External invoice checkbox. A group of additional fields appears.
- If the amount and currency of a third-party invoice match the amount of the invoice (and its linked payment) in the platform and the reseller currency, make sure the External invoice checkbox is cleared.
- Click Submit. The platform changes the payment status to Waiting for payment and sets the specified due date. A customer can pay now, and the payment approval becomes available, both automatic (see Postpaid invoices managed by a third-party ERP system) and manual (see Processing a payment linked to an invoice issued by a third-party ERP system).