Creating an account class
To create an account class:
- Go to Account Terms (see Navigation). The list of account classes is displayed (see Viewing the list of account classes).
- Click Create. The New Account Class page is displayed.
- Set the preferable options in the following groups:
- Click Create. The new account class is created and displayed in the list.
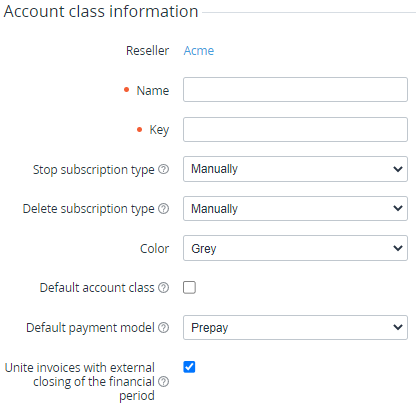
Account class information
In the Account class information group:
- Name — the account class name.
- Key — the key used to refer to the account class by API or placeholders (see Using placeholders for event handlers).
- Stop subscription type — defines how
- are stopped after approving manual operations by a manager (see Manual operations) (by default).
- Delete subscription type — defines how
Manual stopping and deleting can be useful for accounts that require uninterrupted working of all their subscriptions to run vital business processes.
To apply manual stopping and deleting subscriptions to selected plans only, see Creating a service term.
- Color — the color used in the list of accounts (see Viewing the list of accounts) for this account class.
- Default account class — when the checkbox is selected, this account class is automatically assigned to new accounts registered via the Customer Control Panel.
- Default payment model — defines the default payment model of new subscriptions of an account:
- Postpay.
- Prepay.
- Unite invoices with external closing of the financial period — when the checkbox is selected, instead of individual invoices, a single joined invoice is issued for subscriptions of an account when all the following conditions are met:
- Invoices for subscriptions are closed by an external system (see Creating a service term).
- Subscriptions have the same billing day (see Creating a service term).
- Subscriptions have the same payment model (see Viewing and updating subscription's details).
- Subscriptions are linked to plans based on the same application template (connector) (see Viewing and updating a plan).
By default, the Unite invoices with external closing of the financial period checkbox is selected and inherited by account settings, but it can be redefined for each account individually (see Viewing and updating account's details).
Payment model settings: Prepay
In the Payment model settings: Prepay group, the settings define the following:
- How an account can use a negative balance without moving to the Credit hold status.
- Period for cancelling unpaid orders.
Prepaid subscriptions use the account balance and can be automatically stopped by the account credit hold (see Credit hold of the account).
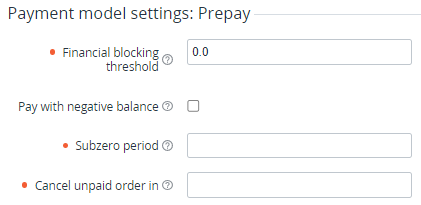
To configure the Prepay model:
In the Financial blocking threshold field, enter the limit within which the account balance can be negative without moving an account to the credit hold (see Credit hold of the account) during the subzero period.
By default, the account's financial blocking threshold equals the financial blocking threshold set in the account class. The financial blocking threshold can be set for each account individually (see Viewing and updating account's details).
Optionally,
If the Pay with negative balance checkbox is not selected, then the financial blocking threshold is ignored and the account balance cannot become negative.
In the Subzero period field, enter a number of days when the account balance can be negative without moving an account to the credit hold (see Credit hold of the account) while the account balance is less than or equal to the financial blocking threshold.
To disable moving to credit hold accounts having a negative balance within the financial blocking threshold, set Subzero period = -1. That corresponds to the infinite subzero period.
- In the Cancel unpaid order in field, enter the number of days when an account should pay for the orders. After this period, orders in the Waiting for payment status are automatically cancelled.
Payment model settings: Postpay
In the Payment model settings: Postpay group, the settings define when postpaid subscriptions are blocked automatically:
- Exceeding the individual consumption thresholds.
- Expiring the linked payments.
Postpaid subscriptions do not use the account balance. Postpaid subscriptions can be automatically stopped only under the terms of the payment model settings (see Specifics of managing postpaid subscriptions).

To configure the Postpay model:
In the Subscription credit limit field, enter the value of the subscription debt (blocking threshold) above which a postpaid subscription will be blocked.
The subscription credit limit can be set individually for each account (see Viewing and updating account's details) and subscription (see Viewing and updating subscription's details).
- In the Payment expiration period field, enter the number of days when an unpaid payment gets the Expired status (see Managing payments), and the subscription stop grace period will be started (see below).
- In the Subscription will be stopped after payment expired (days) field, enter the number of days after which a postpaid subscription linked to a payment in the Expired status will be blocked. The reseller can use this additional grace period to process received payments without stopping a subscription due to the payment expiration.
Guaranteed payment settings
In the Guaranteed payment settings group, the settings define the availability of guaranteed payments for accounts (see Managing guaranteed payments).
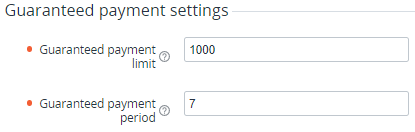
To configure the guaranteed payment settings:
- In the Guaranteed payment limit filed, enter the maximum amount of a guaranteed payment available for an account.
- In the Guaranteed payment period filed, enter the number of days that an account can use a guaranteed payment.
The 0 value in any field prohibits using of guaranteed payments for accounts and hides the corresponding section in the Customer Control Panel for those without previously provided guaranteed payments.