Creating a payment manually
Only a top-up payment can be created manually (see Payment for the manual topping up of the balance). All other types of payments are created automatically (see Payment types).
The reseller can prohibit customers from topping up their balance on their own, but it remains possible to create a top-up payment via the Operator Control Panel. For more details, see Managing financial settings.
To create a payment manually:
- Go to Payments (see Navigation). The list of payments is displayed (see Viewing the list of payments).
- Click Create Payment. The New Payment page is displayed.
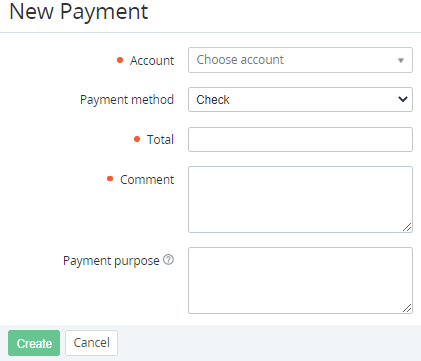
In the Account list, select the required account.
If you create a payment via the Payment tab of the account details page (see Viewing and updating account's details), the current account is selected and cannot be changed.
- In the Payment method list, select the preferred payment method (see Configuring payment methods).
- In the Total field, enter the amount of the payment.
- In the Comment field, enter additional information about the payment.
If the payment purpose must be displayed in a receipt, enter up to 200 symbols in the Payment purpose field. For example: Top-up payment. Prepay for the Microsoft 365 F1 - Annually subscription.
To display the payment purpose in a receipt, make sure that for the selected payment method, the receipt form template includes the
{{payment.purpose}}placeholder (see Creating a payment method).The payment purpose is also displayed in the corresponding transaction after completing the payment.
- Click Create. The payment is created in the Waiting for payment status and displayed in the list of payments.