Switch plan
In this article:
General info
Switching, if available for a subscription, allows you to transfer a subscription and user data to another plan within the service. Switching the plan is performed only manually and can be used in the following cases:
- Immediate transfer from a trial to a commerce period.
- Immediate transfer during a commerce period to another plan. The order amount can be negative or equal to 0.
- Renewal by switching the plan. In this case:
- The number of days before the subscription expiration date when renewal by switching the plan becomes available depends on the subscription.
- The provision of an order is delayed until the subscription expiration date.
- While an order has the Waiting for provisioning status, you can edit it to select a different subscription period and a new quantity of resources.
- After an order is paid (within the Prepay model) or after it is created (within the Postpay model and for orders with a negative or equal to 0 amount), the Auto-renewal option is turned off for a subscription. It remains turned off even after an order in the Waiting for provisioning status is cancelled.
- For some subscriptions, after renewal by switching the plan, cancelling the subscription within a limited period (see Delete subscription) and delayed closing of all charges can be available similar to purchasing a new subscription.
Switching the subscription plan may cause a change in the service terms, billing rules, pricing, and available periods.
During the order creation process, the platform checks your account against the imposed restrictions. If, due to the imposed restrictions, a product is not available for the account or the platform fails to complete the validation process, an order is not created, and an explaining message is displayed. Contact the support team (see Help) or try to repeat all the steps one more time.
Switch plan manually
To switch the plan of a subscription manually:
- In the navigation menu, select Subscriptions. The list of subscriptions of the current account is displayed (see List of subscriptions).
- Find the required subscription in the list.
In the card header, click and select the appropriate action in the menu:
You can also edit an existing order — see Edit order.
- If you want to transfer from a trial to a commerce period, select Switch to a paid plan.
- If you want to switch the plan immediately, select Switch plan.
- If you want to switch the plan later — with renewing:
- If renewing is not yet available, select Switch plan on renewal.
- If renewing is already available:
- Select Renew.
- In a pop-up window, select Renew with switch plan.
- On the Order registration page, complete the following steps:
- Click Submit.
- If the order amount is greater than 0 for a prepaid subscription, pay the payment linked to the created order (see Pay payment).
Choosing plan
On the Choosing plan step:
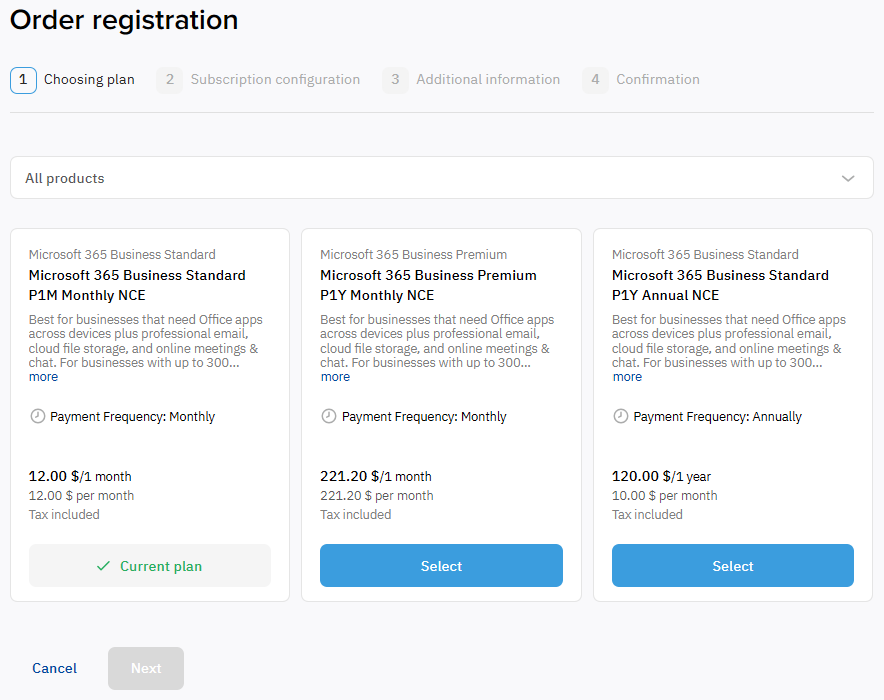
- Optionally, select a product with switchable plans. If there are more than 10 products in the list, you can search by part of its name. If the product is not selected, all available switchable plans are displayed.
- View the list of switchable plans and compare them with the current plan and prices of the subscription in the first card. Every plan card includes the following information:
- The product name.
- The plan name.
- The plan description. Long descriptions are hidden behind the More link.
- Subscription payment frequency.
- The minimum subscription price for a given charging period. Every price is displayed in the corresponding plan currency. If the currency your reseller uses to bill your account differs, the price will be recalculated on the Confirmation step.
- The minimum subscription price per month.
- Information about taxes.
- In the card of the required plan, click Select.
- Click Next.
Subscription configuration
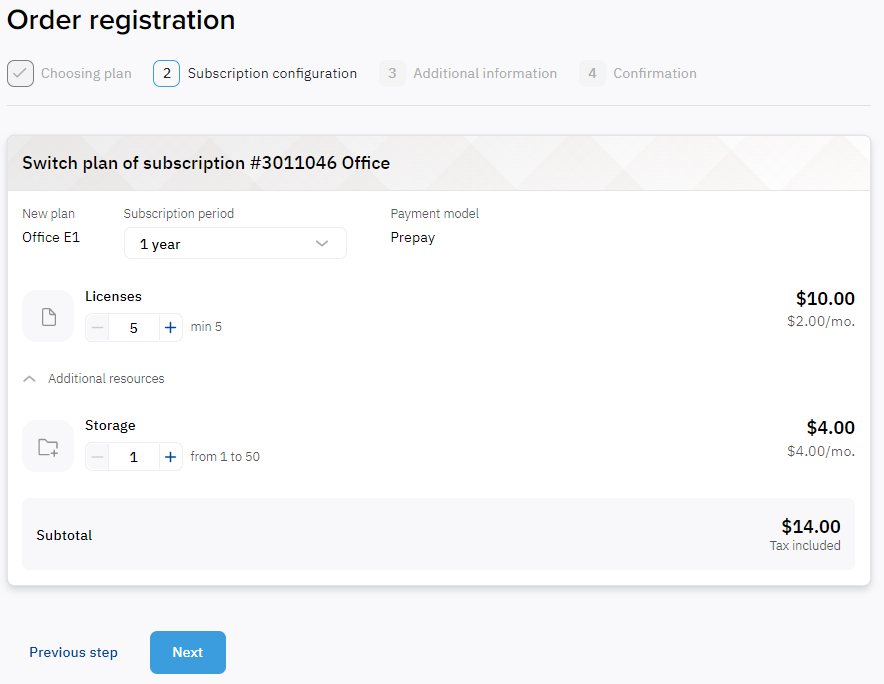
On the Subscription configuration step:
- Check the new plan selected for a subscription.
- Select a period to be applied to a subscription after switching.
- Check the payment model.
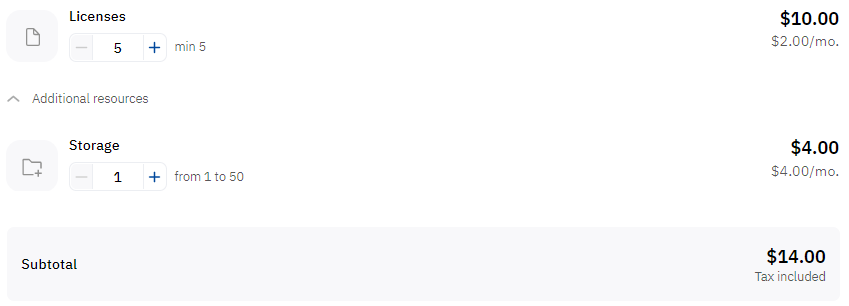
Set the quantity of resources required in the subscription after renewal. By default, the quantity of resources from the current plan is used for the matching resources of the new plan.
Increasing and reducing the resource quantity may be limited for immediate switching due to the service terms.
Reducing the resource quantity may also be limited the resources used on the service side, such as assigned licenses or utilized storage space. If necessary, change the resource quantity used on the service side before switching. The platform checks the resource quantity used on the service side before going to the next order step. If the new resource quantity in an order appears less than the used, this number is displayed in a message, and the next order step becomes not available.
- Check the subscription cost per charging period. The order amount will be calculated on the Confirmation step.
- Check information about taxes, if they are applied to your orders:
- Tax not included — taxes will be calculated and added to the order amount on the confirmation step or later by a third-party system.
Tax included — taxes are already included in the prices.
If only one tax is applied, its name and rate are displayed.
- Click Next.
On the Subscription configuration step, all prices are displayed in the new plan currency. If the currency your reseller uses to bill your account differs, the prices will be recalculated on the Confirmation step.
Additional information
Depending on the service, you may need to set additional parameters for a subscription. For details, see Services. User documentation.
For example, for a subscription with manual approval, specify the sets of values of parameters for every resource unit added to or removed from a subscription.
If no additional parameters are required, this step is skipped automatically.
Confirmation
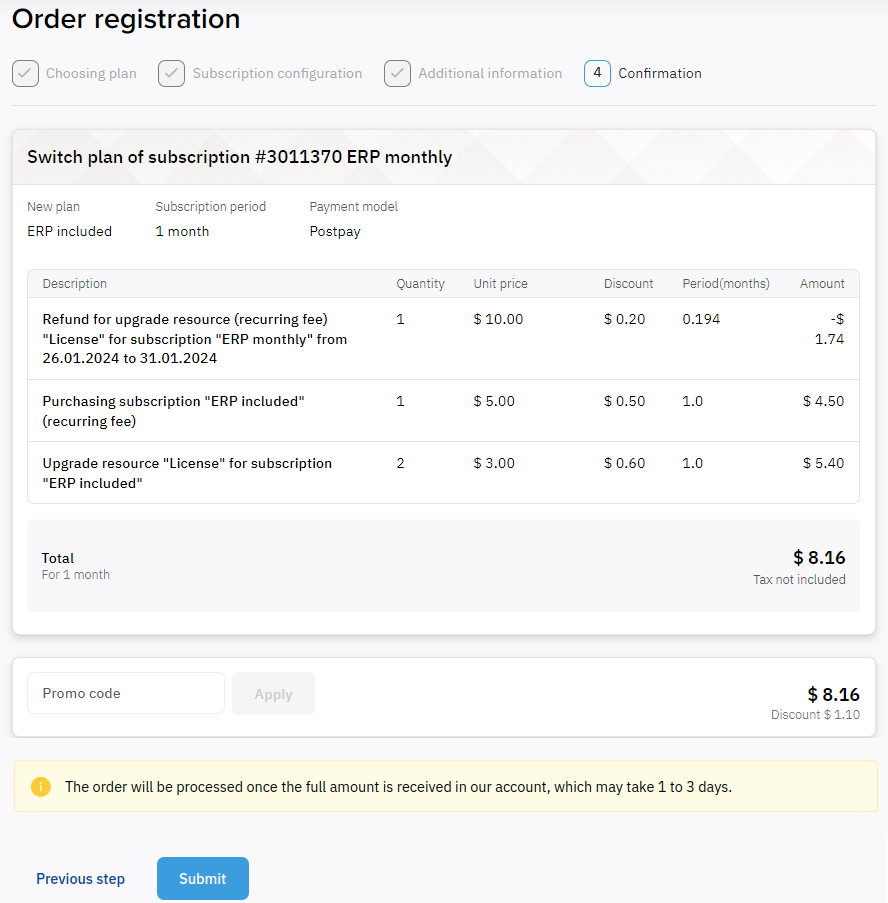
On the Confirmation step:
- Check the following information:
- Refunds for the unused period (if any).
- The new plan selected for a subscription.
- The period to be applied to a subscription after switching.
- Payment model.
- The description of ordered items, including the names of resources and the subscription, covered period, and price type.
- The order amount for the selected resource quantity, resource unit price, discount (if applied), and covered period (in months).
- The name, rate, and amount of every applied tax (if any) — click a link to view details:
- Tax included — taxes are included in the prices. If only one tax is applied, its name and rate are displayed.
- Tax not included — taxes will be calculated and added to the order amount later by a third-party system.
- The discount amount (if applied).
- If you have a promo code, to get a discount:
- Enter your promo code in the Promo code field and click Apply. Using promo codes is not available if your manager ordered this subscription for you at individual prices.
- Check the final amount of the order.
- Check the order and payment processing rules regarding the subscription type and payment model.
On the Confirmation step, all prices are displayed in the currency your reseller uses to bill your account. If the new plan and reseller currencies differ, the prices are recalculated using the actual exchange rate (see Main page).


