Add sales information
The Sales information section includes information and settings required to configure product service plans. A service plan is a set of periods and resources with prices (fees) and terms of provisioning. A service plan includes at least one plan period and optionally can include the trial period and resources. resources are hardware or software components, for example, licenses, users, CPUs, disk space. If your service plan includes resources, you need to complete the Resources section first (see Product resources).
Multilingual product description
If you select several languages for product description (see View and update the vendor profile), you can enter information in every language using additional fields. Distributors in your product distribution network will get your product in the individually selected languages (see Add distributors). If a product does not have the description in the distributor language, during publication (see Publish a product), the English version will be used instead.
To enter information in several languages:
- Next to a field, click the language tag. The Select language menu is displayed.
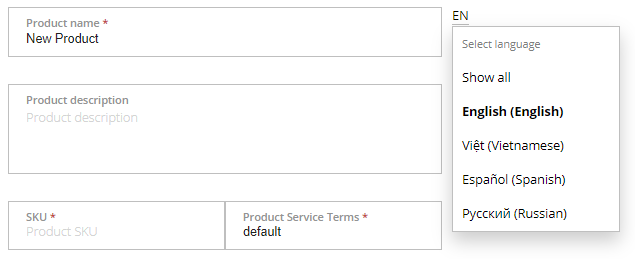
- In the menu, select the language that you want to use for the description of this product additionally to English. To select all languages, click Show all. The selected language in the menu is displayed in bold. English is mandatory and selected by default.
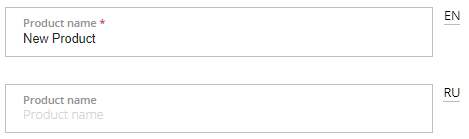
- To hide the Select language menu, click the language tag. The page now includes multiple textual fields with the corresponding language tags.
- When you enter information in a field:
- Fill in the field with the EN tag.
Repeat the step for this field in other languages.
In this article:
Create a service plan
Before creating a service plan, make sure you selected all required currencies in the vendor's profile for fees of your service plan (see View and update the vendor profile).
Add a service plan
To add a service plan:
- On the Product Dashboard, click Billing. The Billing section is displayed.
- Click
 Add service plan. The New service plan page is displayed.
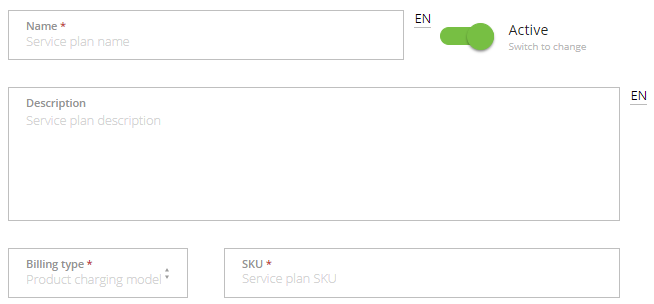
- In the Name field, enter the service plan name. This name corresponds to the plan name in the Operator Control Panel.
If you want to make the service plan unavailable for the distributors, turn off the Active toggle.
If you deactivate a plan that has an active subscription in the ActivePlatform installation, the subscription continues to work until the expiration date and then stops. A subscription to a deactivated plan cannot be renewed.
You can also deactivate a product (see Deactivate a product).
- In the Description field, enter the service plan description. This description corresponds to the plan description in the Operator Control Panel.
In the Billing type list, select the required billing type:
For detailed information on how customers are charged depending on the billing type, see Charges for the subscriptions with different billing types in the ActivePlatform. Operator Control Panel guide.
- Reservation — a customer pays the total price of the ordered subscription and its resources for the whole plan period at the moment of the subscription ordering.
- Pay As You Go internal — a customer pays only for the actual consumption of the resources. The resources net costs are stored in ActivePlatform while information about the consumed amount of resources is requested via API (for example, vCloud Director).
- Pay As You Go external — a customer pays only for the actual consumption of the resources. The resources net costs are stored on the service side and requested via API with information about the consumed amount of resources (for example, Microsoft Azure).
- Pay in full — a customer pays for the maximum quantity of the resources ordered anytime within a month as if the maximum quantity was used for the whole month. Subscriptions with the Pay in full billing type are provided with a free period with a duration of up to one month (to the nearest billing day).
- G Suite — a deprecated billing type aligned with the G Suite Flexible plan billing rules with monthly payments.
- Non-refund — a deprecated billing type aligned with the G Suite Annual plan billing rules with monthly payments.
- CSP Monthly — a billing type aligned with the rules of the Microsoft Cloud Solution Provider program with monthly payments.
- CSP Annual — a billing type aligned with the rules of the Microsoft Cloud Solution Provider program with annual payments.
- ESET solutions for ISP (Monthly) — a billing type aligned with the rules of the ESET partner program for ISP operators.
Non-Recurring Subscription — a billing type for selling Microsoft licenses under the Microsoft Cloud Solution Provider program with the single-time payment.
License-based (Monthly) — a customer pays for the maximum quantity of the resources ordered anytime within a month as if the maximum quantity was used for the whole month. Unlike the Pay in full billing type, a customer pays for the period from the purchase day to the next Billing day as for a whole month.
- Monthly Commitment — a billing type with fixed monthly payments and obligation to use the ordered amount of resources during the whole subscription period. Payment periods are aligned with the billing day, regardless of the subscription activation day. The first payment covers a period from the purchase day to the next billing day. The subsequent payments cover billing periods between the billing days. The last payment covers a period from the previous billing day to the subscription expiration day. In total, a one-year subscription has 13 payments.
Monthly Commitment (monthly interval) — a billing type with fixed monthly payments and obligation to use the ordered amount of resources during the whole subscription period. Payment periods are aligned with the subscription activation day, regardless of the billing day. The first payment covers one month from the purchase day. Every subsequent payment covers one month. In total, a one-year subscription has 12 payments.
CSP Monthly is recommended as the general billing type for a typical SaaS product with monthly payments.
CSP Annual is recommended as the general billing type for a typical SaaS product with annual payments.
Non-Recurring Subscription is recommended as the general billing type for a typical SaaS product with the one-time payment.
In the SKU field, enter the identifier (stock keeping unit) of the service plan.
If the SKU value is not required for provisioning of your service, enter an arbitrary value. You can also use non-unique SKUs for the service plans of your product.
Add plan period information
A new service plan includes one period. In the plan periods of service plan group of elements, configure the plan period:
- To define the duration of the period, do one of the following:
- Using the Quantity field and the Value list box, set the duration of the plan period (for example, 1 month or 1 year).
- For the unlimited duration, turn on the Endless toggle. The service plan can have only one endless period.
- To add a period that allows customers to try your service, turn on the Trial toggle. The trial period is free of charges for customers and cannot be endless.
Optionally, set the plan period fees.
For most SaaS solutions, you need to skip this step and keep the plan period fees equal to 0. A typical SaaS solution has only fees associated with resources. See also the example at the end of the article.

- To add one more period, click
 Add plan period and repeat the steps.
Add a resource
Before adding a resource, make sure you completed the Resources section first (see Product resources).
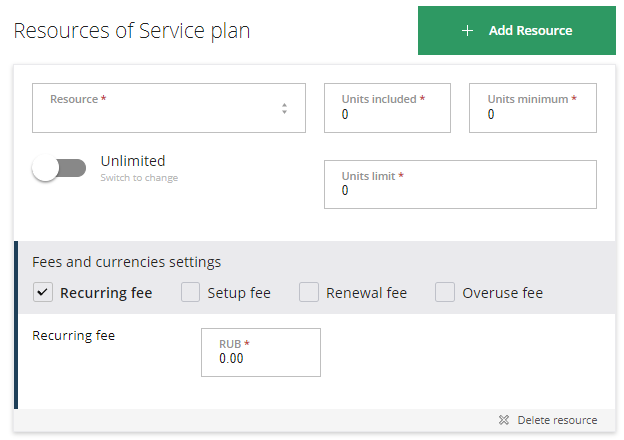
If a service plan should include a resource, in the resources of service plan group of elements, click  Add resource and configure the resource:
In ActivePlatform, both for distributors (resellers) and customers, resources are displayed in the reverse order they are added to a service plan in Vendor Portal.
- In the Resource list, select a resource to include in the plan. The list includes the resources created previously that are not yet included in the service plan.
- In the Units included field, enter the number that corresponds to the resource quantity included in the plan period fees. Since it is recommended not to set the plan period fees, keep the Units included equal to 0, unless you offer any free resource quantity.
- In the Units minimum field, enter the number that corresponds to the minimum resource quantity that can be ordered. To order a subscription, a customer must order at least this quantity of the resource. The minimum quantity cannot be less than the included quantity.
- In the Units limit field, enter the number that corresponds to the maximum resource quantity that can be ordered. To allow customers to order the unlimited quantity of the resource, turn on the Unlimited toggle.
In the Fees and currencies settings group of elements, set the resource fees:
The resource fees are the ones that define the cost of a subscription since it is recommended to set the plan period fees to 0 (see above).
- Select at least one of the following types of fees that will be applied to the resource:
- Recurring fee — a monthly fee for using the resource. For the Pay As You Go internal billing type, this fee is used as the Unit fee (resource/hour).
- Setup fee — a one-time fee for the resource installation. For example, for a perpetual license as a resource, only the Setup fee should be set.
- Renewal fee — a one-time fee for renewing a resource to another period. It is not recommended to set this fee for a typical SaaS solution.
- Overuse fee — a one-time fee for ordering the resource quantity above included. It is not recommended to set this fee for a typical SaaS solution.
- For each of the selected types of fees, enter the corresponding values in every available currency.
- Select at least one of the following types of fees that will be applied to the resource:
- To add one more resource in the service plan, click Add resource and repeat the steps.
Save a service plan
After adding all required plan periods and resources to a service plan:
- Click
 Save. The service plan is created and displayed in the Billing section.
 - To create all required service plans. repeat the steps above or copy the created service plan (see below) and then update the copied data.
- When you finished, select your next step:
- To continue configuring the product and go to the next section, click Continue.
- To return to the Product Dashboard, click Go to Product Dashboard.
Copy a service plan
To reduce the number of manual operations, you can make a copy of a service plan, including its plan periods and resources.
To copy a service plan:
- On the Product Dashboard, click Billing. The Billing section is displayed with the list of service plans.
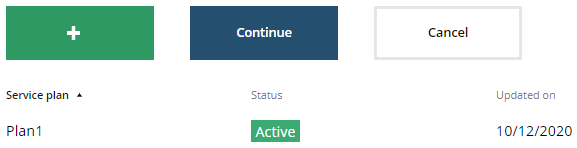
- In the list, click the required service plan. The page with the service plan details is displayed.
- At the bottom of the page, click Copy service plan. The Copying service plan pop-up window is displayed.
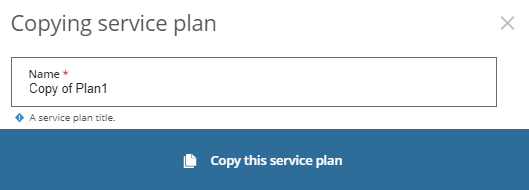
- In the Name field, enter the name of a new service plan. The default name is Copy of <original service plan name>.
- Click Copy this service plan. The updated list of service plans is displayed including the copied service plan.
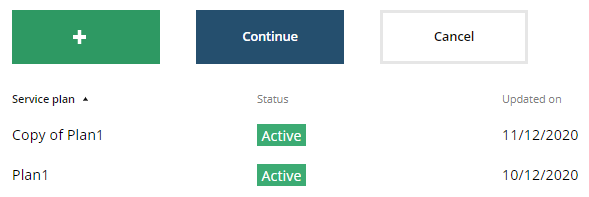
Now you can configure the copied service plan.
Example for a typical SaaS solution
To have a better understanding of service plans, periods, and resources, you may refer to the following example.
Let's consider the following situation.
As a vendor, you want to sell your SaaS solution licensed by the number of users. You have offers both for personal users and for small and big teams:
- Personal users pay you a fixed fee every month. You can also offer a more affordable price for personal users who agreed to pay for your service annually.
- Teams pay every month the total fee for the ordered number of licenses (seats) regardless of the factual number of active users of your service. If necessary, a team can increase or decrease the number of licenses within their current tier.
- You are ready to offer a free trial period to allow personal users and teams to try your service.
- You sell your SaaS solution in USD.
| Personal (monthly) | Personal (annual) | Team 10 | Team 50 | ||||
|---|---|---|---|---|---|---|---|
| 1 user | 1 user | 2-10 users | 11-50 users | ||||
| Free trial | $10 per month | Free trial | $9 per month | Free trial | $8 per user per month | Free trial | $7 per user per month |
| 7 days | Paid monthly | 7 days | Paid annually | 7 days | Paid monthly | 7 days | Paid monthly |
In terms of Vendor Portal, this service will be represented as a product with 4 plans. All the plans includes one commercial period, one trial period, and one common resource — Users. As a vendor registered in Vendor Portal, you have USD as the default currency.
To configure the corresponding plans in Vendor Portal for a created product, you need to complete the following steps:
- As a precondition, create a resource — Users (see Product resources). The Users resource represents the licenses (seats) that a customer orders with a subscription.
- Add a service plan for personal users who pay monthly:
- On the Product Dashboard, click Billing. The Billing section is displayed.
- Click
 Add service plan. The New service plan page is displayed.
 - In the Name field, enter
Personal (monthly). - In the Billing type list, select CSP Monthly.
- In the SKU field, enter
001. Let's assume that this value is the SKU of your Personal (monthly) plan. - In the Plan periods of service plan group of elements:
- Configure the commercial period:
- Turn on the Endless toggle. It means that a subscription never expires.
- Make sure that the Setup fee is not selected. It means that a customer will not pay for a subscription itself. All the required fees will be applied to the resource.
- Add the trial period:
- Click
 Add plan period. The new group of elements is displayed.
 - In the Quantity field, enter
7. - In the Value list, select Day. It means that the trial period has a duration of 7 days.
- Click
- Configure the commercial period:
- In the Resources of service plan group of elements:
- Click
 Add resource.
 - In the Resource list, select Users.
- Make sure that the Units included is equal to 0. It means that the service plan does not include free resources.
- In the Units minimum and Units limit fields, enter
1. It means that a customer has to order at least 1 license. At the same time, the maximum number of licenses for personal use is equal to 1 too, so the customer cannot add and order any extra resources. - In the Recurring fee field, enter
10. It means that a customer will pay $10 per license per month. - Make sure that all other fees are not selected. It means that you will charge a customer with a fixed $10 monthly fee only.
- Click
- Click
 Save. The Billing section is displayed.
- Add a service plan for personal users who pay annually:
- Click
 Add service plan. The New service plan page is displayed.
 - In the Name field, enter
Personal (annual). - In the Billing type list, select CSP Annual.
- In the SKU field, enter
002. Let's assume that this value is the SKU of your Personal (annual) plan. - In the Plan periods of service plan group of elements:
- Configure the commercial period:
- In the Quantity field, enter
1. - In the Value list, select Year. It means that customers will order subscriptions for one year. If not renewed manually or automatically, after this period, the subscription stops. It is recommended to activate the Auto renewal option for the product (see General information).
- Make sure that the Recurring fee is equal to 0 and all other fees are not selected. It means that a customer will not pay for a subscription itself. All the required fees will be applied to the resource.
- In the Quantity field, enter
- Add the trial period:
- Click
 Add plan period. The new group of elements is displayed.
 - In the Quantity field, enter
7. - In the Value list, select Day. It means that the trial period has a duration of 7 days.
- Click
- Configure the commercial period:
- In the Resources of service plan group of elements:
- Click
 Add resource.
 - In the Resource list, select Users.
- Make sure that the Units included is equal to 0. It means that the service plan does not include free resources.
- In the Units minimum and Units limit fields, enter
1. It means that a customer has to order at least 1 license. At the same time, the maximum number of licenses for personal use is equal to 1 too, so the customer cannot add and order any extra resources. - In the Recurring fee field, enter
9. It means that a customer will pay $9 per license per month ($108 in an annual payment). - Make sure that all other fees are not selected. It means that you will charge a customer with a fixed $9 monthly fee only.
- Click
- Click
 Save. The Billing section is displayed.
- Click
- Add a service plan for small teams (2–10 members):
- Click
 Add service plan. The New service plan page is displayed.
 - In the Name field, enter
Team 10. - In the Billing type list, select CSP Monthly.
- In the SKU field, enter
003. Let's assume that this value is the SKU of your Team 10 plan. - In the plan periods of service plan group of elements:
- Configure the commercial period:
- Turn on the Endless toggle. It means that a subscription never expires.
- Make sure that the Setup fee is not selected. It means that a customer will not pay for a subscription itself. All the required fees will be applied to the resource.
- Add the trial period:
- Click
 Add plan period. The new group of elements is displayed.
 - In the Quantity field, enter
7. - In the Value list, select Day. It means that the trial period has a duration of 7 days.
- Click
- Configure the commercial period:
- In the resources of service plan group of elements:
- Click
 Add resource.
 - In the Resource list, select Users.
- Make sure that the Units included is equal to 0. It means that the service plan does not include free resources.
- In the Units minimum field, enter
2. It means that a customer has to order at least 2 licenses. - In the Units limit field, enter
10. It means that a customer can order at most 10 licenses. - In the Recurring fee field, enter
8. It means that a customer will pay $8 per license per month. - Make sure that all other fees are not selected. It means that you will charge a customer with a monthly fee based on the number of licenses only. The minimal charge is $16.
- Click
- Click
 Save. The Billing section is displayed.
- Click
- Add a service plan for big teams (11–50 members):
- Click
 Add service plan. The New service plan page is displayed.
 - In the Name field, enter Team 50.
- In the Billing type list, select CSP Monthly.
- In the SKU field, enter
004. Let's assume that this value is the SKU of your Team 50 plan. - In the Plan periods of service plan group of elements:
- Configure the commercial period:
- Turn on the Endless toggle. It means that a subscription never expires.
- Make sure that the Setup fee is not selected. It means that a customer will not pay for a subscription itself. All the required fees will be applied to the resource.
- Add the trial period:
- Click
 Add plan period. The new group of elements is displayed.
 - In the Quantity field, enter
7. - In the Value list, select Day. It means that the trial period has a duration of 7 days.
- Click
- Configure the commercial period:
- In the Resources of service plan group of elements:
- Click
 Add resource.
 - In the Resource list, select Users.
- Make sure that the Units included is equal to 0. It means that the service plan does not include free resources.
- In the Units minimum field, enter 11. It means that a customer has to order at least 11 licenses.
- In the Units limit field, enter 50. It means that a customer can order at most 50 licenses.
- In the Recurring fee field, enter
7. It means that a customer will pay $7 per license per month. - Make sure that all other fees are not selected. It means that you will charge a customer with a monthly fee based on the number of licenses only. The minimal charge is $77.
- Click
- Click
 Save. The Billing section is displayed.
- Click
After publication, the product will be displayed in Customer Store. Assuming that the selected distributor applies the 2.0 markup for all your prices, your service offer to customers may look as follows.

Next: Add distributors