Configuring the Customer Control Panel appearance
You can customize the appearance of the Customer Control Panel, including logos, colors, and displayed sections.
To configure the appearance of the Customer Control Panel:
- Go to Customer Control Panel (see Navigation). The Customer Control Panel settings page is displayed with the list of settings:
- Click the settings name. The selected settings page is displayed.
- Specify the necessary options.
- If needed, specify the options in one more language:
- In a group of settings that supports localization, next to the list with the default language, click Add Localization. A new group of elements is displayed below.
- In the new group, in the Localization list, select the required language.
- Specify the necessary options in the selected language.
- Click Update.
See also other settings for the Customer Control Panel:
- Logos and favicon — Configuring logos.
- Date format — General system settings.
- The availability of the Account balance and joining Payments manually — Managing financial settings.
- The expiration period of the email confirmation token — User settings.
General settings
Design settings
Design settings is a tab for configuring the appearance of the Customer Control Panel and the header and footer of its pages:
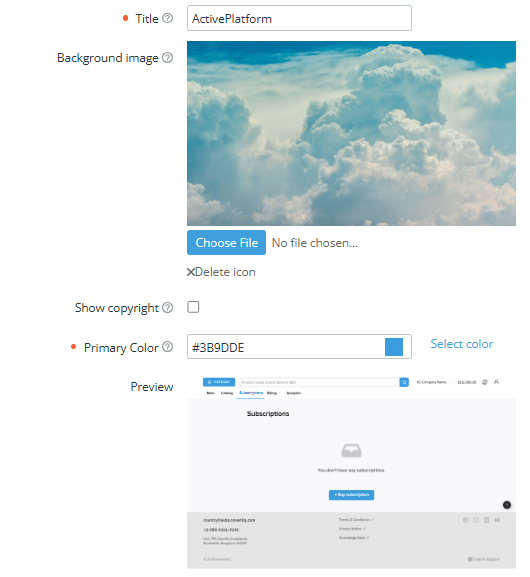
- Title — the common part of the title for all pages of the Customer Control Panel, up to 70 characters. Default: ActivePlatform - Панель управления клиента
- Background image — the background image for the Sign in, Sign up, Reset Password pages in the Customer Control Panel. Max file size: 3 Mb. If no file is chosen, the default background is used.
- Show copyright — if the checkbox is selected, the footer of the sing-in page includes the ActivePlatform copyright info. Example: © Powered by ActivePlatform, 2021
- Primary Color — the color applied to primary buttons, selected tabs, sections, counters, and its HEX code (default: #3B9DDE):
- Select color — select the primary color via the palette instead of entering its HEX code.
- Preview — a preview of a Customer Control Panel page with the selected primary color. To preview the changes after entering or selecting a new color, click any place on the page.
Header — a group of elements displayed in the header of all pages the Customer Control Panel pages (see Screen Layout) except for the sig-in page:
Navigation menu display — select the position of the navigation menu items (not supported in the current version):
- Inline — the horizontal position on the top of the pages.
- Vertical — the vertical position on the left side of the pages within the expandable menu.
Show application sections — select the navigation menu items to display:
- Main
- Catalog — the checkbox is always selected and read-only.
- Subscriptions — the checkbox is always selected and read-only.
- Billing — the checkbox is selected if any of the subitems is selected.
- Payments
- Closing documents
- Guaranteed payments
- Balance statement
- Analytics
- Quotes — the checkbox is always selected and read-only.
- A list of links (up to 15 items). For every language, the settings are displayed in the groups as follows:
- Localization — select the language for the link. The first group on the page has the read-only list with the language set as default for new users of the Customer Control Panel (see Managing language settings).
- Name — the link text in the selected language, up to 50 characters. By default, the field is empty, and the link is not displayed in the Customer Control Panel in the selected language.
- URL — the link URL. It is possible to specify any internal or external link.
- Priority — the number that defines the position of a link in the list. Links with a higher number are displayed at the top of the list. The default value is 0.
To add one more link in the selected language:
- Under the Name field, click Add link. A new group of elements is displayed below.
- In the new group, specify the necessary options.
To delete a link, click Delete in the corresponding group. No confirmation required. For the first group, the Delete button clears all the entered data.

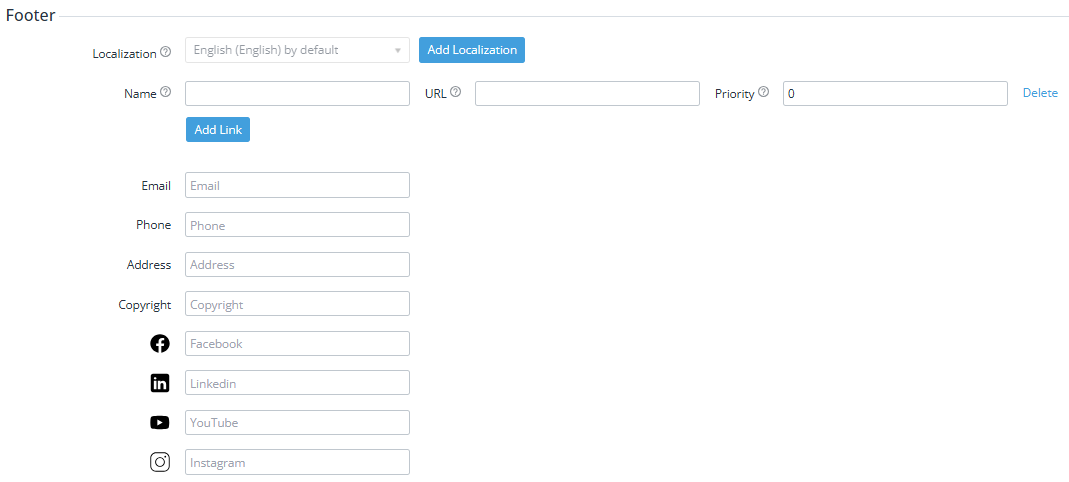
Footer — a group of elements displayed in the footer of all pages the Customer Control Panel pages (see Screen Layout) except for the sig-in page:
- A list of links (up to 15 items). For every language, the settings are displayed in the groups as follows:
- Localization — select the language for the link. The first group on the page has the read-only list with the language set as default for new users of the Customer Control Panel (see Managing language settings).
- Name — the link text in the selected language, up to 50 characters. By default, the field is empty, and the link is not displayed in the Customer Control Panel in the selected language.
- URL — the link URL. It is possible to specify any internal or external link.
- Priority — the number that defines the position of a link in the list. Links with a higher number are displayed at the top of the list. The default value is 0.
To add one more link in the selected language:
- Under the Name field, click Add link. A new group of elements is displayed below.
- In the new group, specify the necessary options.
To delete a link, click Delete in the corresponding group. No confirmation required. For the first group, the Delete button clears all the entered data.
- Contact information — a list of optional fields:
- Phone
- Address
- Copyright
- YouTube
Connecting external plugins
Connecting external plugins is a tab to connect external services to the Customer Control Panel.
The list includes the following columns:
- Name — the name of a service.
- Active — indicates whether a service is connected.
- Updated at — the date when the service settings were changed.
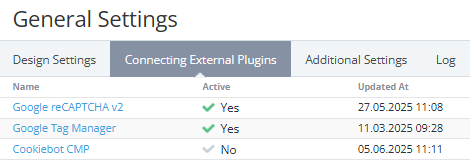
To configure a service:
- In the list, click the service name. The service settings page is displayed.
- Configure the service settings.
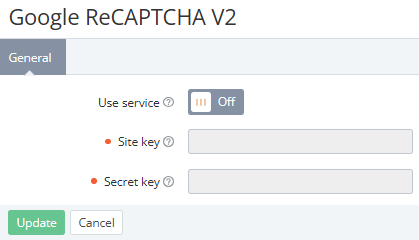
Configuring Google reCAPTCHA v2
Google reCAPTCHA v2 (invisible) is a free service used to prevent the registration and authorization of spam bots.
The service settings page includes the following elements:
- Use service — if the switch is turned On, protection against spam bots is used on the sign-in and sign-up pages of the Customer Control Panel. The reCAPTCHA icon is displayed in the lower right corner of these pages. A user needs to solve a test if only the service cannot confirm it is a human. To make reCAPTCHA work, get a pair of permanent keys on the Google side and specify them in the fields below.
- Site key — a key to be automatically inserted in the HTML code of the Customer Control Panel pages.
- Secret key — a private key used to transfer data between the Customer Control Panel and reCAPTCHA.
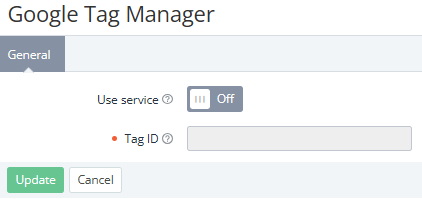
Configuring Google Tag Manager
Google Tag Manager is a free service used to measure marketing parameters and collect web analytics with Google Analytics.
The service settings page includes the following elements:
- Use service — if the switch is turned On, the service is used on all pages of the Customer Control Panel. To make Google Tag Manager work, get a tag ID on the Google side and specify it in the field below.
- Tag ID — a Google tag ID to be automatically inserted in the HTML code of the Customer Control Panel pages. See Find the Google tag ID.
Configuring Cookiebot CMP
Cookiebot CMP is a service for managing the use of cookies.
The service settings page includes the following elements:
- Use service — if the switch is turned On, the service is used. The Customer Control Panel displays the Cookiebot banner in accordance with the settings on the service side, and the Cookie Policy page is available. For correct operation, obtain the settings ID on the Cookiebot side and specify it in the field below.
- Setting ID — the Cookiebot settings ID that is associated with the specified domain and determines the appearance of the banner. See also Cookiebot Support.

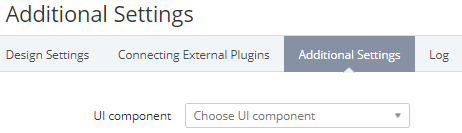
Additional settings
Additional settings is a tab for configuring the appearance of specific elements of the Customer Control Panel pages. These settings override any other. For example, displaying the navigation menu items defined in this tab has a higher priority than the Header section of the Design settings tab.
UI component — the list of elements appearance of which can be configured (see Screen Layout):
For the names of elements with the configured settings, the (specified) text is added.
- Analytics tab
- Billing tab
- Buy subscription button
- Catalog tab
- Change language button
- Main page tab
- Subscription tab
- Show on page — if the checkbox is selected, an element is displayed on the Customer Control Panel pages.
- Component name — the displayed name for an element in the selected language, up to 50 characters.
- Localization — select the language for the name of an element. The first group on the page has the read-only list with the language set as default for new users of the Customer Control Panel (see Managing language settings).
To delete all additional settings for an element:In the UI component list, select the required element with the (specified) text added to its name.
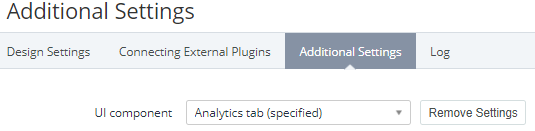
- Click Remove settings next to the UI component list.
- Confirm the action.
Login page
Login page is a section with the settings of the optional welcome text displayed on the sign-in page of the Customer Control Panel in different languages (see Signing in to the Customer Control Panel). For every language, the settings are displayed in the groups as follows:
- Localization — select the language for the welcome text. The first group on the page has the read-only list with the language set as default for new users of the Customer Control Panel (see Managing language settings).
- Welcome text — the welcome text in the selected language. HTML is also supported. By default, the field is empty, and the welcome text is not displayed in the Customer Control Panel in the selected language.

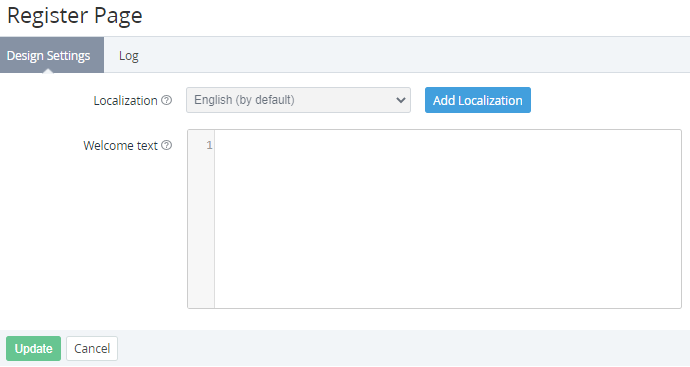
Register page
Register page is a section with the settings of the optional welcome text displayed on the sign-up page of the Customer Control Panel in different languages (see Short registration). For every language, the settings are displayed in the groups as follows:
- Localization — select the language for the welcome text. The first group on the page has the read-only list with the language set as default for new users of the Customer Control Panel (see Managing language settings).
- Welcome text — the welcome text in the selected language. HTML is also supported. By default, the field is empty, and the welcome text is not displayed in the Customer Control Panel in the selected language.
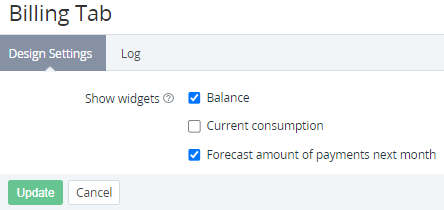
Billing tab
Billing tab is a section with the Show widgets settings to select widgets displayed in the Billing section of the Customer Control Panel (see Screen Layout):
- Balance — a widget with the available funds on the Account balance.
- Current consumption — a widget with the total debt for all postpaid Subscriptions of the Account for the current Billing period, excluding Payments for the previous Billing period. By default, not selected.
- Forecast amount of payments next month — a widget with the total amount of monthly payments for all active Subscriptions of the Account within the Prepay and Postpay models billed monthly.
Main page
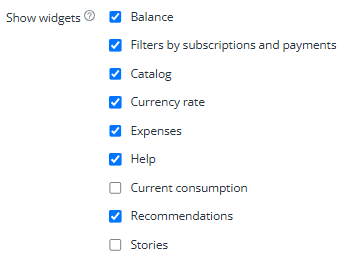
Main page is a section with the settings to select data displayed on the main page of the Customer Control Panel (see Screen Layout):
- Balance — a widget with the available funds on the account balance.
- Filters by subscriptions and payments — a widget with the list of active subscriptions, subscriptions to expire in 10 days, and payments in the Waiting for payment and Expired statuses.
- Catalog — a widget with the list of product categories.
- Currency rate — a widget with the currency rates for the reseller currency. Only selected currencies are displayed (see Managing currency rates).
- Expenses — a widget with comparative expenses for the last two months.
- Help — a widget with custom links (see below).
- Current consumption — a widget with the total debt for all postpaid subscriptions of the account for the current billing period, excluding payments for the previous billing period. By default, not selected.
- Recommendations — the recommendation service widgets (see Product recommendations) that are displayed on the main page with the ability to select one of the subscriptions, as well as at the bottom of the detailed subscription page on any tab:
- Add services & products — a widget with a list of featured products only for the customer's subscriptions that have one of the following statuses: Active, Delivered, Graced, Installing, Activating, Renewing, Updating, Stopping, Switching, Waiting for manual approve.
- Upgrade your subscription — a widget with a list of products for immediate switch of the plan of a commercial subscription that has one of the following statuses: Active, Delivered, Graced.
- Boost your subscription — a widget with a list of add-ons for а commercial subscription on a prerequisite plan. Only for the customer's subscriptions that have one of the following statuses: Active, Delivered, Graced, Installing, Activating, Renewing, Updating, Stopping, Switching, Waiting for manual approve.
- Stories — the What’s new widget with a stories collection (see Stories widget). By default, not selected.
- Settings for Help widget is a group with the list of links (unlimited) displayed in the Help widget. For every language, the settings are displayed in the groups as follows:
- Localization — select the language for the link text. The first group on the page has the read-only list with the language set as default for new users of the Customer Control Panel (see Managing language settings).
- Name — the link text in the selected language, up to 50 characters. By default, the field is empty, and the link is not displayed in the Customer Control Panel in the selected language.
- URL — the link URL. It is possible to specify any internal or external link.
- Priority — the number that defines the position of a link in the list. Links with a higher number are displayed at the top of the list. The default value is 0.
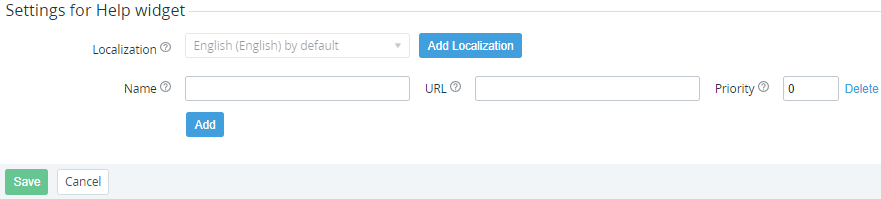
To add one more link in the selected language:
- Under the Name field, click Add. A new group of elements is displayed below.
- In the new group, specify the necessary options.
To delete a link, click Delete in the corresponding group. No confirmation required. For the first group, the Delete button clears all the entered data.
- Info messages setting is a group with the list of messages (up to 5 items) displayed for all accounts on the main page of the Customer Control Panel. For every language, the settings are displayed in the groups as follows:
- Importance — the priority of a message and the color or the icon:
- High (by default) — a message with the red icon. The high-importance messages are displayed higher and sorted by the creation date.
- Low — a message with the blue icon. The low-importance messages are displayed lower and sorted by the creation date.
- Show from/to — the start and finish date of the period when a message is displayed. Both fields are optional. An empty field means that the corresponding period limit is not applied.
- Info messages text — the message text in the selected language. HTML is also supported. By default, the field is empty, and a message is not displayed.
- Localization — select the language for the link text. The first group on the page has the read-only list with the language set as default for new users of the Customer Control Panel (see Managing language settings).
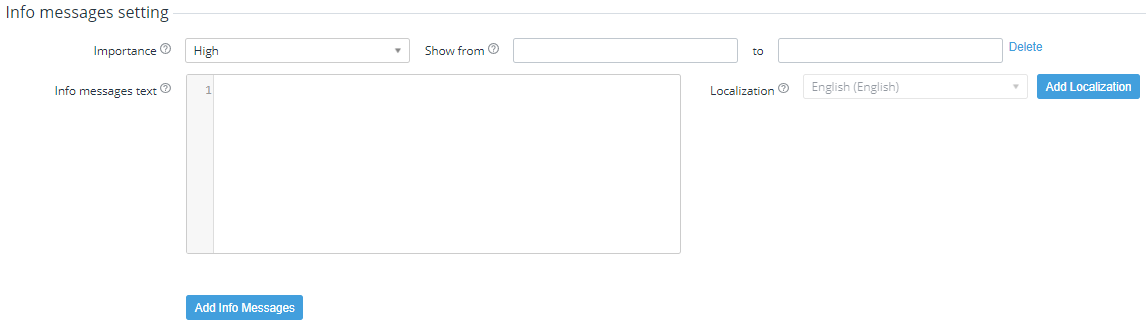
To add one more message in the selected language:
Under the Info messages text field, click Add Info Messages. A new group of elements is displayed below.
In the new group, specify the necessary options.
- Importance — the priority of a message and the color or the icon:
To delete a link, click Delete in the corresponding group. No confirmation required. For the first group, the Delete button clears all the entered data.
Support page
Support page is a section with the settings of content that can be displayed on the Support page in the Customer Control Panel (see Help):
- Configure the internal page in the Customer Control Panel — select between the internal and external support page:
- To use an external support page:
- Turn Off the Configure the internal page in the Customer Control Panel switch.
- In the External URL field, enter the URL of the required page.
- To use the internal Support page:
- Make sure the Configure the internal page in the Customer Control Panel switch is turned On.
- Specify the necessary options in the following groups:
- Introduction text.
- Content sections setting.
- Feedback sections setting.

- To use an external support page:
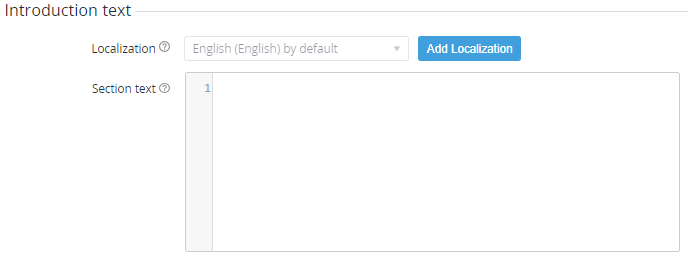
- Introduction text is a group of settings for an optional introduction text displayed on the internal Support page. For every language, the settings are displayed in the groups as follows:
- Localization — select the language for the link text. The first group on the page has the read-only list with the language set as default for new users of the Customer Control Panel (see Managing language settings).
- Section text — the introduction text in the selected language. HTML is also supported. By default, the field is empty, and the introduction text is not displayed in the Customer Control Panel in the selected language.
- Content sections setting is a group with the list of cards (up to 5 items) displayed on the internal Support page. For every language, the settings are displayed in the groups as follows:
- Localization — select the language for a card. The first group on the page has the read-only list with the language set as default for new users of the Customer Control Panel (see Managing language settings).
- Title — the card name in the selected language, up to 50 characters. By default, the field is empty, and the card name is not displayed in the Customer Control Panel in the selected language.
- Section text — the text of a card in the selected language. HTML is also supported. By default, the field is empty, and the text of a card is not displayed in the Customer Control Panel in the selected language.
- Image — the image of a card in the selected language. Max file size: 3 Mb.
- Priority — the number that defines the position of a card in the list. Cards with a higher number are displayed at the top of the list. The default value is 0.
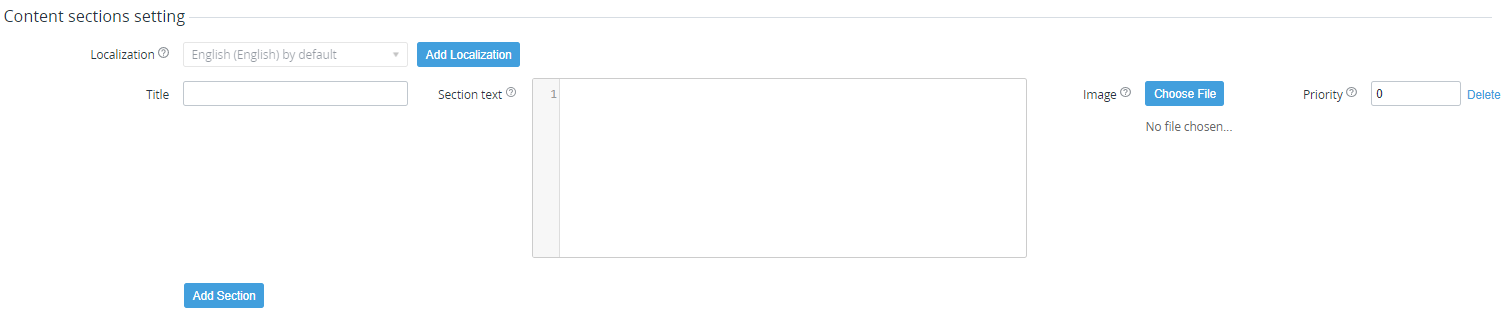
To add one more card in the selected language:
- Under the Name field, click Add section. A new group of elements is displayed below.
- In the new group, specify the necessary options.
To delete a card, click Delete in the corresponding group. No confirmation required. For the first group, the Delete button clears all the entered data.
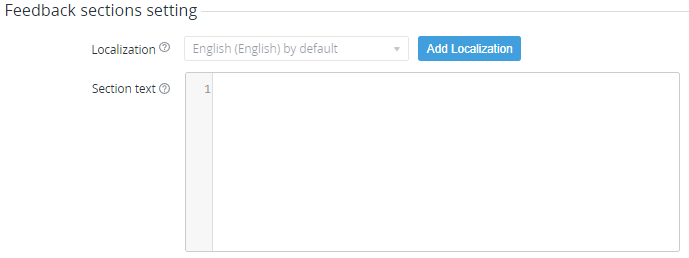
- Feedback sections setting is a group of settings for the feedback contact information displayed below the cards on the internal Support page. For every language, the settings are displayed in the groups as follows:
- Localization — select the language for a feedback contact information. The first group on the page has the read-only list with the language set as default for new users of the Customer Control Panel (see Managing language settings).
- Section text — the text of a feedback contact information in the selected language. HTML is also supported. By default, the field is empty, and the text of a feedback contact information is not displayed in the Customer Control Panel in the selected language.
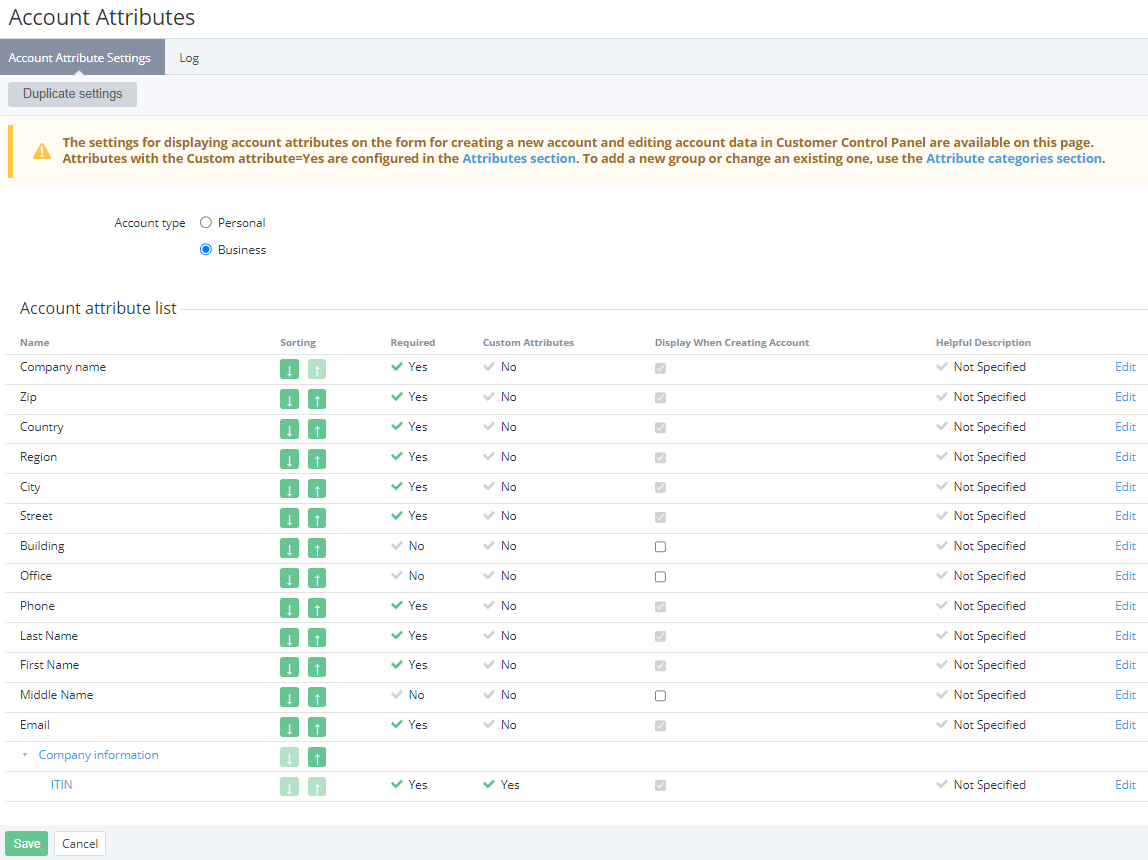
Account attributes
Account attribute settings
Account attributes is a section used to manage the displaying of the system and custom public account attributes in the Customer Control Panel (see Account details), including creating a new account (see Full registration):
- Duplicate settings — a button to copy the account attribute settings from one account type to another.
- Account type — the list of account types of the reseller (see Account types).
- Account attribute list — a table with all system and custom public attributes applied to the Account entity in the order that they are displayed in the Customer Control Panel. The list includes the following columns:
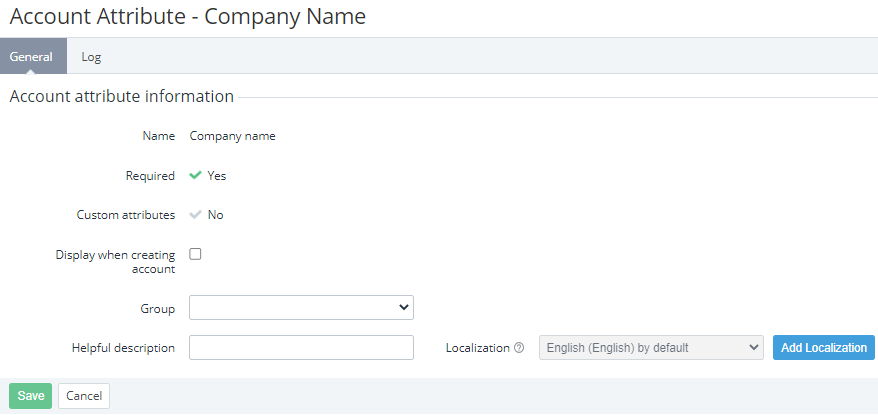
- Name — the name of an attribute or attribute category. The names of custom attributes and attribute categories are displayed as links to their details pages (see Viewing and updating attribute's details and Viewing and updating attribute category). The Company name attribute is only displayed if the Primary name field is non-empty in the selected account type (see Creating an account type).
- Sorting — the arrow buttons ↓ and ↑ to move an attribute or attribute category down and up in the list.
- Required — indicates whether an attribute is required.
- Custom attributes — indicates whether an attribute is a custom (see Managing attributes).
- Display when creating account — indicates whether an attribute is displayed when a new account is created.
- Helpful description — indicates whether an attribute has a hint. By default, no hints are specified.
- A column with the Edit link to configure an attribute.
To change the displaying order of attributes and attribute categories in the Customer Control Panel:
- In the Account type list, select the required account type. In the Account attribute list table, the attributes and attribute categories related only to the selected account type are displayed in the following order:
- System attributes.
- Custom attributes without a category: in descending order of their weight. Custom attributes without weight are sorted alphabetically (numerical values, A to Z, А to Я).
- Custom attributes with a category. Categories are sorted alphabetically, custom attributes — in descending order of their weight, custom attributes without weight — alphabetically.
- To arrange an attribute or attribute category in the list, do any of the following:
- Click the arrow buttons ↓ and ↑ to move an attribute or attribute category down and up in the list. You can move custom attributes with categories within their category only.
- Click and hold the mouse button and drag any row to any position in the list. You can move custom attributes with categories within their category and out of it.
- Click Save.
To configure whether an attribute is displayed when a new account is created:
- For an optional system attribute, select or clear the checkbox in the Display when creating account column. By default, the checkboxes are not selected, and such attributes are not displayed when a new account is created.
- For a required system attribute, configuring is not available. Such attributes are always displayed when a new account is created.
- For a custom attribute:
- Click the name of a custom attribute. The custom attribute details page is displayed (see Viewing and updating attribute's details).
- Configure whether the attribute is displayed:
- To display the attribute, turn Off the Read only for admin switch.
- To hide the attribute, turn On the Read only for admin switch.
- Click Update.
To copy the account attribute settings (the sorting, displaying when a new account is created, and hints) from one account type to another:
- Click Duplicate settings. A pop-up window appears.

- In the Account attribute settings for account type list, select the source account type.
- In the Duplicate in account type list, select the target account type.
- Click Duplicate. The account attribute settings are copied for all applicable attributes. The rest of the attributes are moved to the bottom of the list.
Edit account attribute settings
To update the name of an attribute category, see Viewing and updating attribute category.
To update the name, format, and availability of a custom attribute, see Viewing and updating attribute's details.
- To change the group or update the hint of a system or custom attribute:
- In the line with the required attribute, click Edit. The attribute page is displayed. The following parameters are read-only:
- Name.
- Required — indicates whether an attribute is required.
- Custom attributes — indicates whether an attribute is a custom (see Managing attributes).
- In the Group list, select the required group. The empty value in the list corresponds to displaying the attribute without a group.
- If necessary, enter the text of a hint for the attribute in every required language:
- Localization — select the language of the hint. The first group has the read-only list with the language set as default for new users of the Customer Control Panel (see Managing language settings).
- Helpful description — a text in the selected language of up to 255 characters.
Stories widget
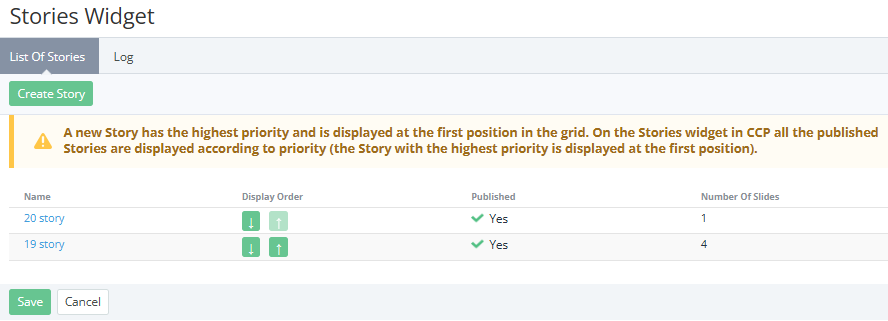
List of stories
Stories widget is a section used to manage the displaying of stories on the main page of the Customer Control Panel (see Main page):
- Create story — a button to create a story.
- A list of stories with the following columns:
- Name — the internal name of a story used in the Operator Control Panel only.
- Display order — the arrow buttons ↓ and ↑ to move a story down and up in the list. In the Customer Control Panel, stories are displayed in the same order as they are located in the list, from top to bottom.
- Published — indicates whether a story is displayed in the Customer Control Panel.
- Number of slides — the number of slides in a story.
Create a story
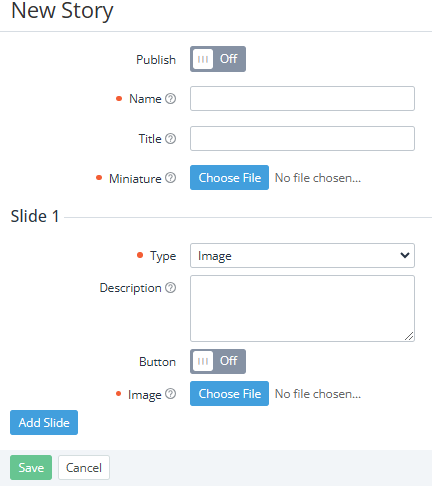
To create a story:
- Click Create story. The New story page will be displayed.
- Configure the story settings:
- To make the story visible in the Customer Control Panel, turn on the Publish toggle.
- In the Name field, enter the story name, which will be visible in the Operator Control Panel only.
- Optionally, in the Title field, enter the text that will be displayed in the story thumbnail. Maximum is 52 characters.
- In the Miniature field, upload the story cover file. Recommended size: 344x344px, up to 5 MB. File type: jpg, jpeg, gif, png.
- Add data for at least one slide:
- In the Type list, select the data type:
- Image
- Video
- Optionally, in the Description field, enter the text that will be displayed at the bottom of the slide over the image or video. Maximum is 232 characters.
- If you want to add a button that will be displayed at the very bottom of the slide:
- Turn on the Button toggle.
- In the Button name field, enter the button text. Maximum is 36 characters.
- In the Button link field, enter the URL to which the user will be redirected when they click the button. For links to external resources, specify the full address.
- In the Type list, select the data type:
- In the Image or Video field, upload the slide file:
- Recommended image size: 840x1460px, up to 5 MB. File type: jpg, jpeg, gif, png.
- Recommended video size: 840x1460px, up to 100 MB. File type: mp4.
- If you need to add another slide:
- Click Add slide.
- Add data for the new slide.
- After adding all the slides, click Save. The new story will be added to the top of the list.
Configure the display of stories
Stories are displayed in the Customer Control Panel if the display of the Stories widget is enabled.
To set up the order in which stories are displayed, change their order in the list in any of the following ways:
- Click the arrow buttons ↓ and ↑ to move a story down and up in the list.
- Click and hold the mouse button and drag any row to any position in the list.
After changing the display order, click Save.
To remove a story from the Customer Control Panel:
- In the list, click the name of the story. A page with its parameters will be displayed.
- If you need to temporarily hide a story, turn off the Publish toggle and save the changes.
- If you need to delete an individual slide, in the slide field group, click Delete slide and save the changes. Confirmation of deletion is not required.
- If you need to completely delete a story, click Delete and confirm the action. Confirmation of deletion is not required if the story is not published.