Ordering a subscription at the plan prices
To order a subscription at the plan prices:
Go to Subscriptions (see Navigation). The list of subscriptions is displayed (see Viewing the list of subscriptions).
You can also use the Subscriptions tab of the account details page to order a subscription for the selected account (see Viewing and updating account's details).
- Click Order Subscription and complete the following steps:
Select an account, plan, and period
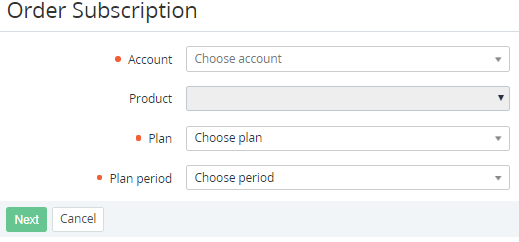
On the first step:
- In the Account list, select the required account (see Managing accounts).
- In the Plan list, select the required plan (see Managing plans). You can find a plan by its ID, name, or SKU. Start entering a value in the field to view the options regarding your input. The list includes all plans available for purchase by a manager (see Plan information). The Product field is updated automatically when a plan is selected.
In the Plan period list, select the required period (see Plan Periods). If the list of plan periods includes only one item, this item is displayed automatically and cannot be changed.
Click Next.
Configure the order
On the second step:
- If necessary, in the Subscription name field, enter a new name for the subscription. It is recommended to limit its length to 200 characters. By default, it matches the plan name. If the Template of subscription name in the linked product is configured correctly (see Creating a product), the entered value will be used in the subscription name after the service provisioning.
- Make sure that:
- In the Provisioning date field, the current date is set. It means that the sales order will be created with the following attributes: Delayed = No, Provisioning date = the order creation date (see Viewing order details). If it is necessary to postpone the order provisioning to an arbitrary date, see Delayed ordering a subscription.
The Individual prices switch is turned Off. It means a subscription will be ordered at the plan prices. To order a subscription at the individual prices, see Ordering a subscription at the individual prices.
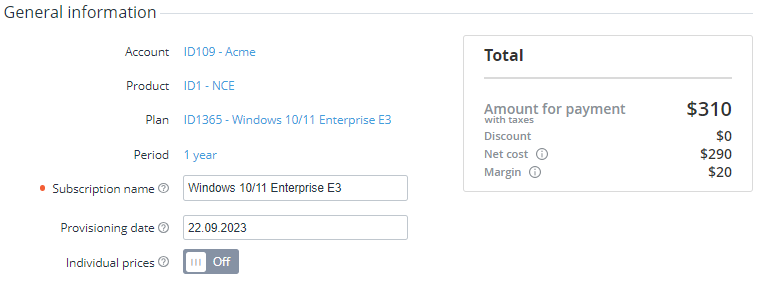
- Account — the ID and name of the selected account as a link to its details page.
- Product — the name of the selected product as as a link to its details page.
- Plan — the ID and name of the selected plan as a link to its details page.
Period — the selected duration of the plan period as a link to its details page.
If you proceed to any of the links, all the order information you entered will be lost.
- Subscription name — by default, matches the plan name. It is recommended to limit its length to 200 characters.
- Provisioning date — by default, the current date. See also Delayed ordering a subscription.
- Individual prices — the switch allows you to set individual prices for the subscription (see Ordering a subscription at the individual prices).
- Total — information about a payment (see Managing payments) that will be created after the order confirmation:
- Amount for payment — the total amount and currency of a payment for the order and information about taxes (see Managing taxes):
- Without taxes — the taxes amount will be calculated and added to the displayed amount on the order confirmation page.
- With taxes — the displayed amount already includes all taxes.
- Discount — the amount, currency, and percent of the applied discount.
Net cost — only for the delegated plans. It displays the amount and currency of a payment for the order as if the subscription is ordered from the upstream reseller. The net cost includes a discount of the Reseller type (see Managing Reseller discounts). If the upstream reseller did not offer a discount of the Reseller type, only net cost is displayed. If several discounts are available, the discount that gives the minimal price is applied.
The Net cost field displays the current value. The net cost can be changed, for example if the upstream reseller changes the plan price or offers or cancels the discount.
Margin — only for delegated plans. It displays the amount of a margin that the reseller gets from a payment for the order. It is calculated as the difference between the amount for payment and the net cost, including a discount. If the plan currency differs from the reseller currency, the exchange rate from the order charges is used to calculate the margin.
The information displayed in the Total section differs depending on the billing type (see Charges for the subscriptions with different billing types) of the selected plan.
- Amount for payment — the total amount and currency of a payment for the order and information about taxes (see Managing taxes):
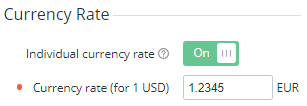
If the plan currency differs from the reseller currency, in the Currency Rate group, select the currency rate for this order:
An individual currency rate for an order may be required if a manager previously agreed with a customer upon purchase at a certain rate, but a different rate is already in effect for the reseller in the platform.
An individual currency rate can be used only if the plan currency differs from the reseller currency (see Editing general information about the plan and Viewing and updating reseller general information). It is applied only to this order. If the rates in an order and for the reseller differ more than 10%, a warning tip is displayed on the order confirmation page.
- To use the actual currency rate set by the reseller in the platform:
- Make sure the Individual currency rate switch is turned Off.
- In the Currency rate field, check the actual rate for the plan currency (see Managing currency rates).
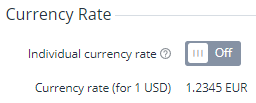
- To use an individual currency rate for this order:
- Turn On the Individual currency rate switch. The Currency rate field becomes available for editing. Its default value is the actual rate for the plan currency (see Managing currency rates).
In the Currency rate field, enter your currency rate with up to 4 decimal places.
If you change the position of the Individual currency rate switch, the entered value in the Currency rate field will be cleared.
- To use the actual currency rate set by the reseller in the platform:
In the Payment model group, select and, if necessary, configure the payment model. The Prepay model does not require any configuration. For the Postpay model, you can redefine the subscription credit limit.

- Payment model — a list to select the payment model for the subscription. The default value is defined in an account class (see Creating an account class):
- Postpay — a customer pays after using a service.
- Prepay — a customer pays before using a service.
- The Subscription credit limit field and the
- Payment model — a list to select the payment model for the subscription. The default value is defined in an account class (see Creating an account class):
Optionally, in Responsible managers by product group, in a list with a role, select the required responsible manager. The manager will be assigned to the account within the product. If the account already ordered a subscription within the product, the lists are prefilled with the current responsible managers. You can change the managers assignment later, on the account information page (see Viewing and updating account's details).
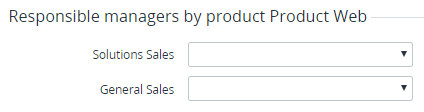
The Responsible managers by product group is displayed if a product has at least one responsible manager with the assigned role. A list for a role is displayed if there is at least one active responsible manager assigned to this role.
In the Subscription group, check the price of the selected period. If available, check the price against the net cost and ERP price of the period. The Subscription group is not displayed if the cost of the selected period is 0.
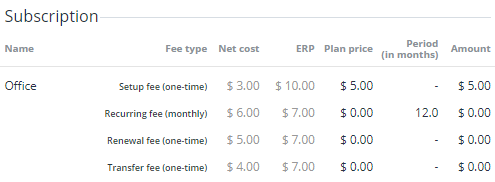
The table includes the following columns:
- Name — the order type and subscription name.
Fee type — the types of charges applied to the subscription and included in a payment for the order (see Plan Periods).
The fees applied to resources are displayed below in the Resources group.
- Net cost — displayed if at least one fee type of the period net cost in the plan is non-zero. All amounts in the column are displayed in gray.
- ERP — displayed if at least one fee type of the period ERP price in the plan is non-zero. All amounts in the column are displayed in gray.
- Price — the cost of the selected period.
- Period (in months):
- For monthly payments — a period covered by a payment linked to the order is created. It can be a part of the current billing period or the whole period of the subscription, depending on the billing type.
- For one-time payments — the period is not set.
Discount — the amount and currency of the applied discount. If there are no discounts, the column is not displayed.
- Amount — the amount and currency of a fee.
In the Resources group, in the Total amount column, enter the required quantity of resources. The page is reloaded automatically. The Resources group is not displayed for trial subscriptions or if the plan does not have any resources. To change the quantity of resources in a trial subscription, see Upgrading or downgrading subscription resources.
Check the price of every added resource. If available, check the price against the net cost and ERP price of a resource.
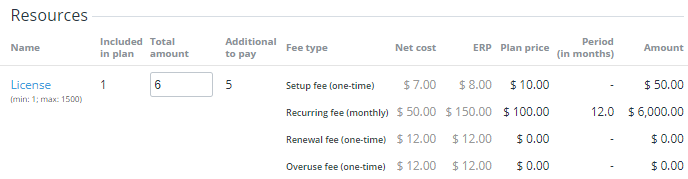
The table includes the following columns:
- Name — the name of a resource as a link to the resource details page.
- min — the minimum quantity of a resource that can be ordered.
- max — the maximum quantity of a resource that can be ordered.
- Included in plan — the quantity of a resource included in the subscription price.
- Total amount — the total quantity of a resource in the order.
- Additional to pay — the quantity of the additionally ordered resource.
- Fee type — the types of charges applied to a resource and included in a payment for the order (see Plan Resources).
- Net cost — displayed if at least one fee type of the resource net cost in the plan is non-zero. All amounts in the column are displayed in gray.
- ERP — displayed if at least one fee type of the resource ERP price in the plan is non-zero. All amounts in the column are displayed in gray.
- Price — the cost of a resource.
- Period (in months):
- For monthly payments — a period covered by a payment linked to the order is created. It can be a part of the current billing period or the whole period of the subscription, depending on the billing type.
- For one-time payments — the period is not set.
Discount — the amount and currency of the applied discount. If there are no applied discounts, the column is not displayed.
Amount — payment amount and currency for a fee type.
- Name — the name of a resource as a link to the resource details page.
- Click Next to go to the next step.
Configure additional attributes
On an additional step:
- For a subscription to a service based on the Manual Provisioning plugin with parameters applied to resources (see Managing Parameters of an Application Template), specify the sets of values of the parameters for every unit of the resource.
- For a subscription to a service based on the Vendor Service Plugin (VSP), MicrosoftCspProducts, or Office365 plugin, specify the values of additional attributes. See details in Services. Operator Guide (you need to be logged in).
Confirm the order
On the last step:
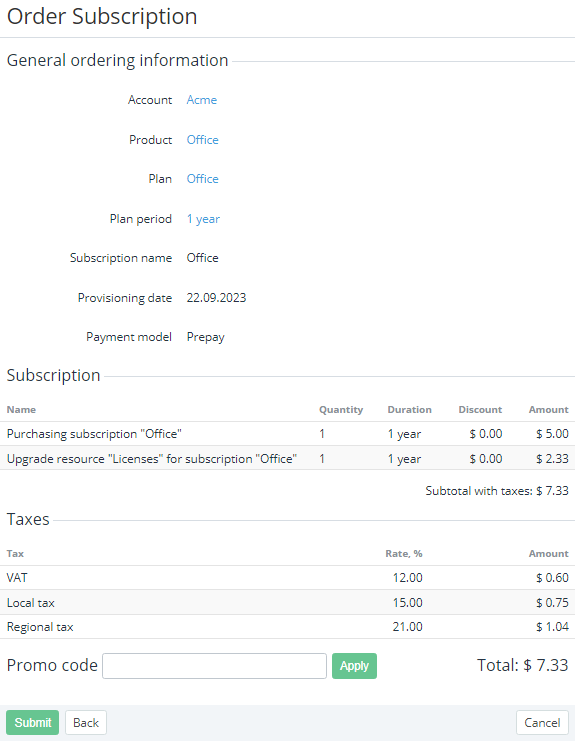
In the General ordering information group, check information about account, product, plan, plan period, subscription name, provisioning date, payment model, and the order details. For the Postpay model, an information message is displayed. The message explains specifics of the postpaid subscription provisioning.
If the plan currency differs from the reseller currency (see Editing general information about the plan and Viewing and updating reseller general information):
- On the subscription configuration steps, all prices are displayed in the plan currency.
- On the order confirmation step, all prices are displayed in the reseller currency. The currency rate applied to an order is displayed in the General ordering information group.
If confirmation of an order is not available, a message explaining the reason is displayed, and the Submit button is not available.
- Check the applied taxes:
- In the Subscription group, check how taxes are calculated for the order (see Taxes calculation settings):
- Subtotal without taxes — the displayed amount does not include the sum of taxes from the Taxes group.
- Subtotal with taxes — the sum of taxes from the Taxes group is already included in the displayed amount.
- In the Taxes group, check the name, rate, and amount of every tax applied to the order items (see Managing taxes).
- In the Subscription group, check how taxes are calculated for the order (see Taxes calculation settings):
If it is necessary to get a discount for the account, in the Promo Code field, enter your code (see Managing promo codes) and click Apply.
Click Submit. The subscription is ordered.